The affiliate program lets your students earn a commission on every sale they refer. This guide shows you how to set up the program, add affiliates, pay them, add a join banner to your site, and read the reports.
Disclaimer: The default commission rate is 0. Set your rate in the Commission section before you turn the program on, otherwise no sale will earn a commission.
Here’s how to set it up.
1. From the admin dashboard, go to Sales, click Affiliates, and open the Settings tab.
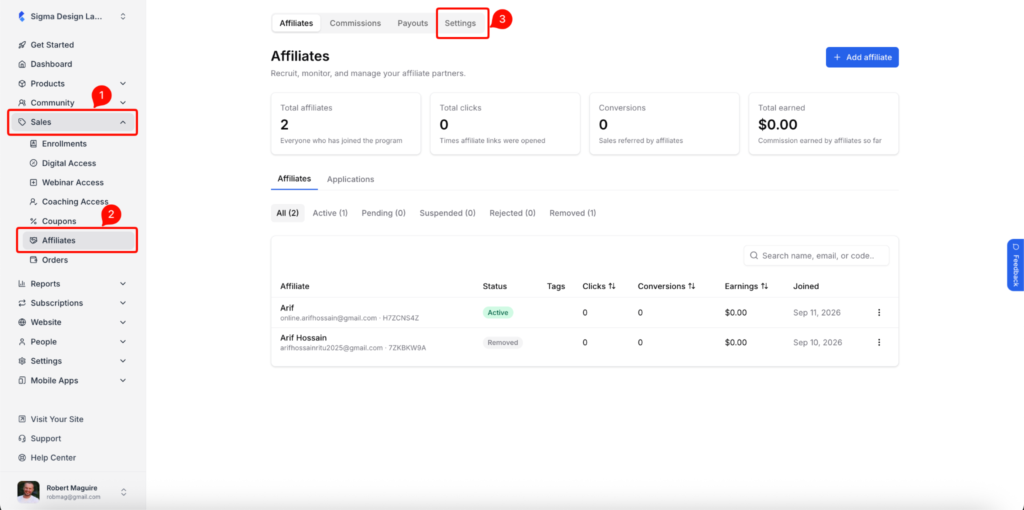
2. Click Commission and set your rate.
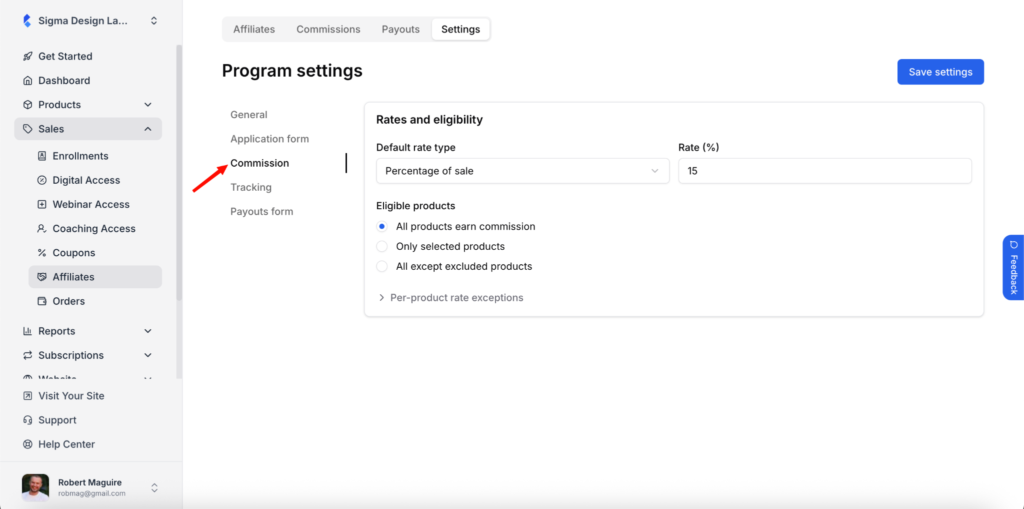
- Default rate type: Choose Percentage of sale or Fixed amount per sale.
- Rate: The percentage or amount affiliates earn per sale.
- Eligible products: Choose All products earn commission, Only selected products, or All except excluded products. A product picker appears for the last two options.
- Per-product rate exceptions: Expand this to set a different rate for specific products.
3. Click Tracking and set the timing rules.
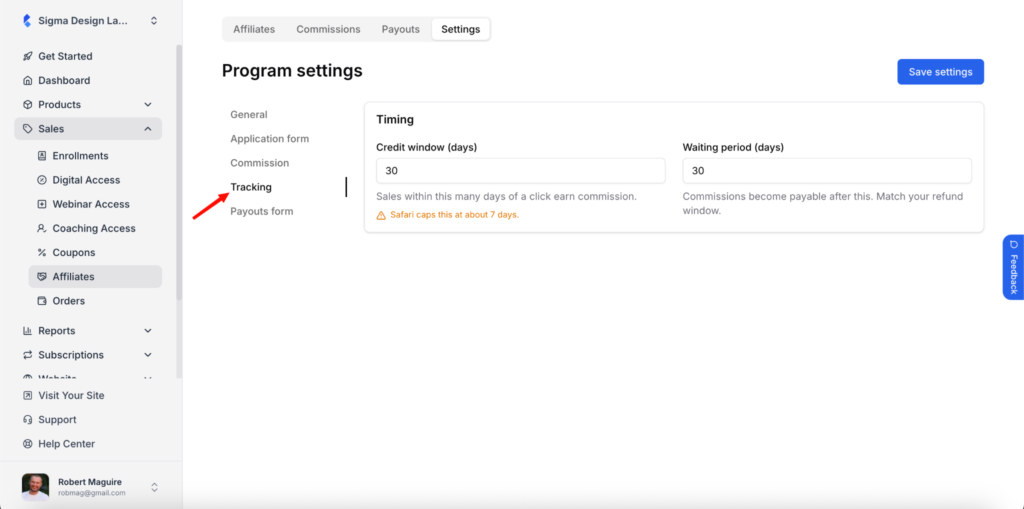
- Credit window (days): Sales within this many days of a click earn commission. The default is 30. Safari limits this to about 7 days.
- Waiting period (days): Commissions become payable after this. The default is 30. Match this to your refund window. Set it to 0 if you want commissions to become payable as soon as they are earned.
Disclaimer: Affiliate tracking depends on the cookie consent banner on your site (Settings › Cookie Consent). A visitor who arrives through an affiliate link must click Accept on the banner before they buy. If they reject the banner, or buy without clicking anything on it, the affiliate earns nothing on that purchase. Accepting later, including through the Cookie preferences link, does not recover a purchase that has already gone through. Let your affiliates know this so a missing commission does not come as a surprise.
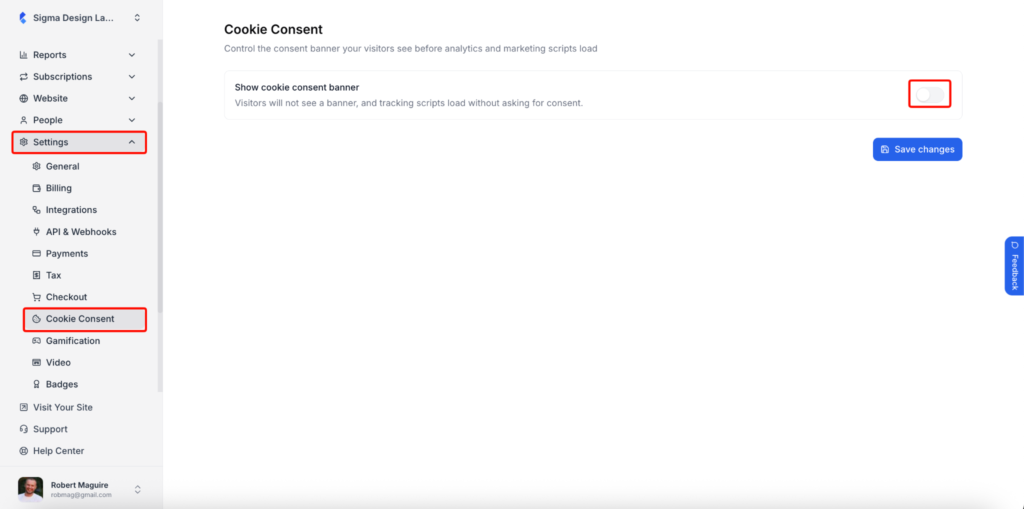
Tip: The default banner only mentions analytics and marketing cookies, which gives a buyer no reason to accept. In Settings › Cookie Consent, edit the Banner message to say that accepting also credits the person who referred them. You have 300 characters.
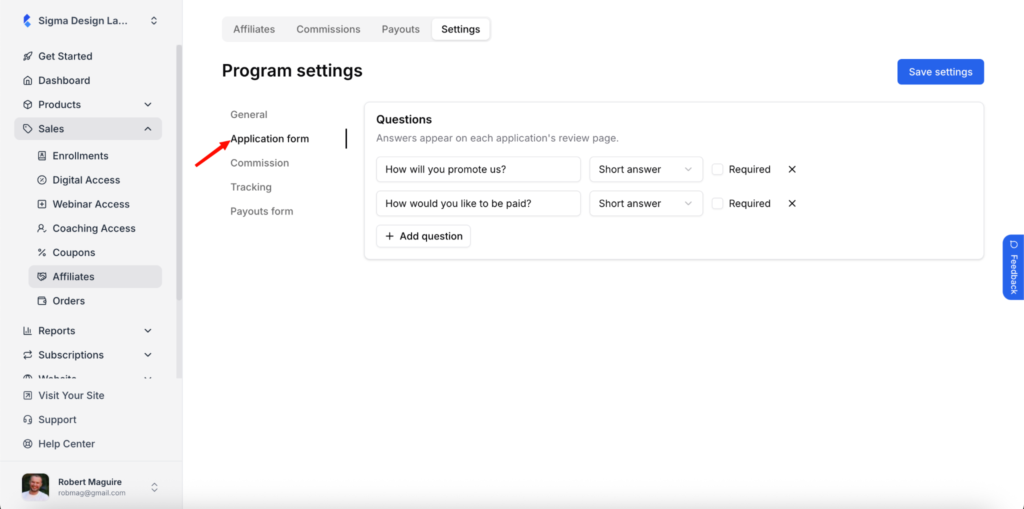
4. Click Application form and set the questions students answer when they apply. Click Add question to add one, and tick Required to make it mandatory.
5. Click Payouts form and set what you need to pay affiliates.
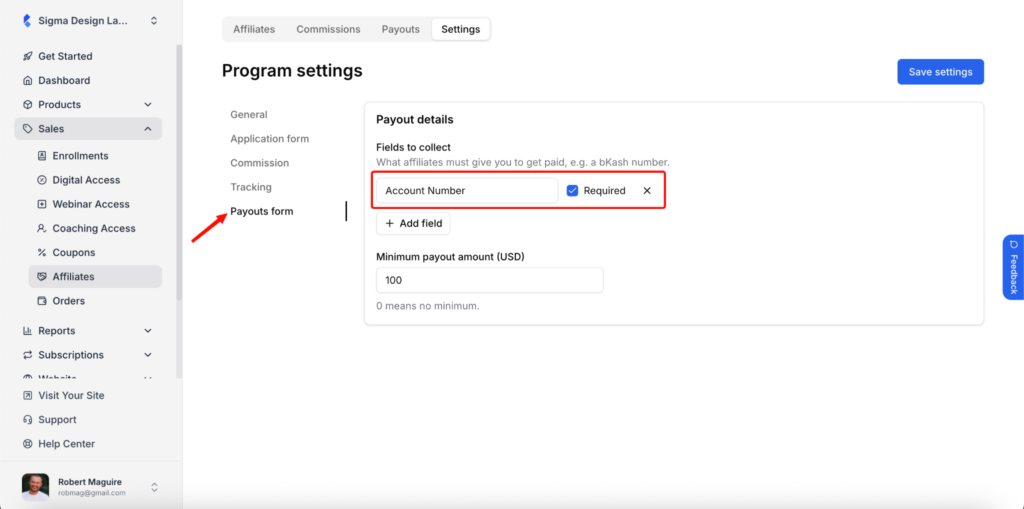
- Fields to collect: The details affiliates must give you to get paid, such as a bKash number. Click Add field for each one. Affiliates fill these in from their own dashboard.
- Minimum payout amount (USD): Affiliates appear in your payable list once they reach this amount. 0 means no minimum.
6. Click General and choose how people join.
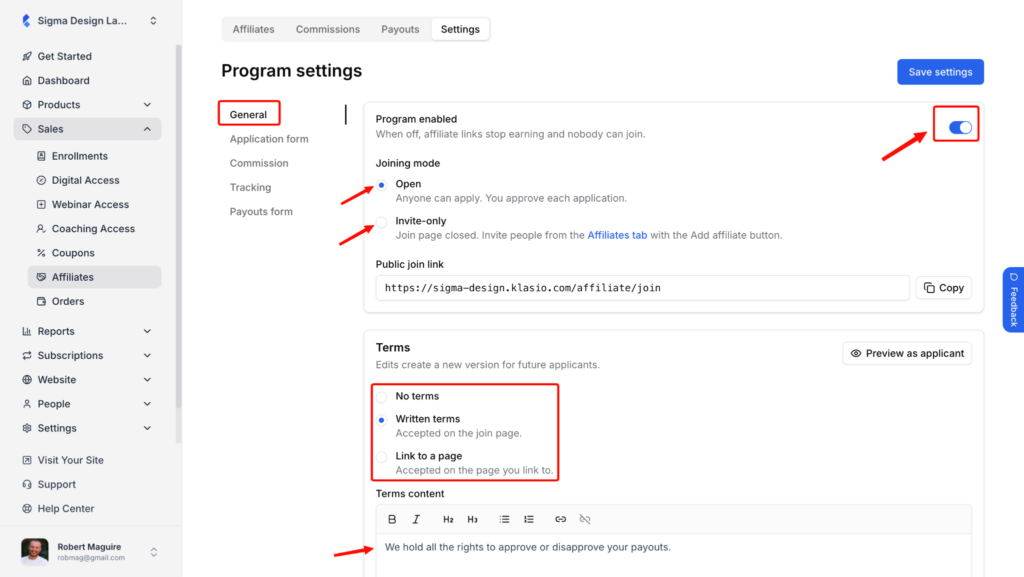
- Joining mode: Open lets anyone apply and you approve each application. Invite-only closes the join page, and you add affiliates from the Affiliates tab.
- Public join link: The page where students apply. Click Copy to share it. Shown in Open mode only.
- Terms: Choose No terms, Written terms, or Link to a page. Click Preview as applicant to see the join page.
7. Turn on Program enabled and click Save settings.
Your affiliate program is now live.
Add an Affiliate
There are two ways to add affiliates. Students can apply through your join link, or you can add them directly.
Add a student directly
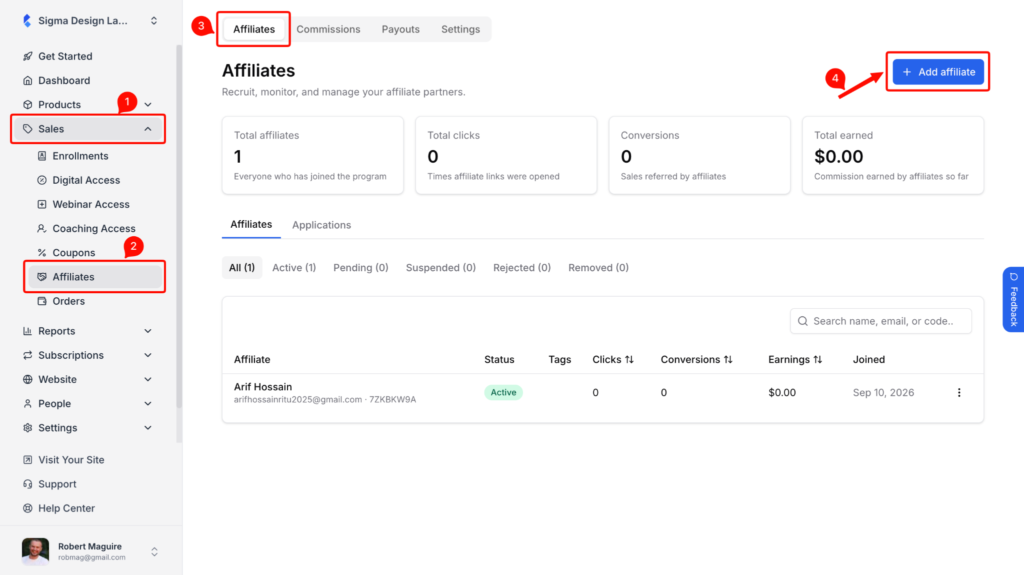
1. From the admin dashboard, go to Sales, click Affiliates, and click Add affiliate.
2. Search for a student by name or email and click their name. They become an active affiliate right away with your default rate.
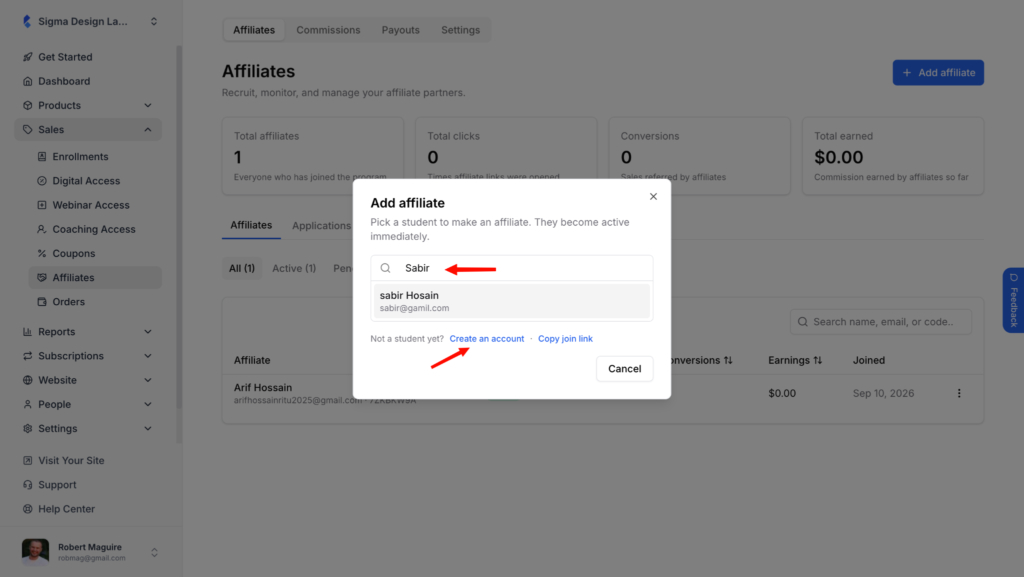
If the person is not a student yet, click Create an account to add them first, or click Copy join link to send them the application page.
Approve an application
1. From the admin dashboard, go to Sales, click Affiliates, and open the Applications tab.
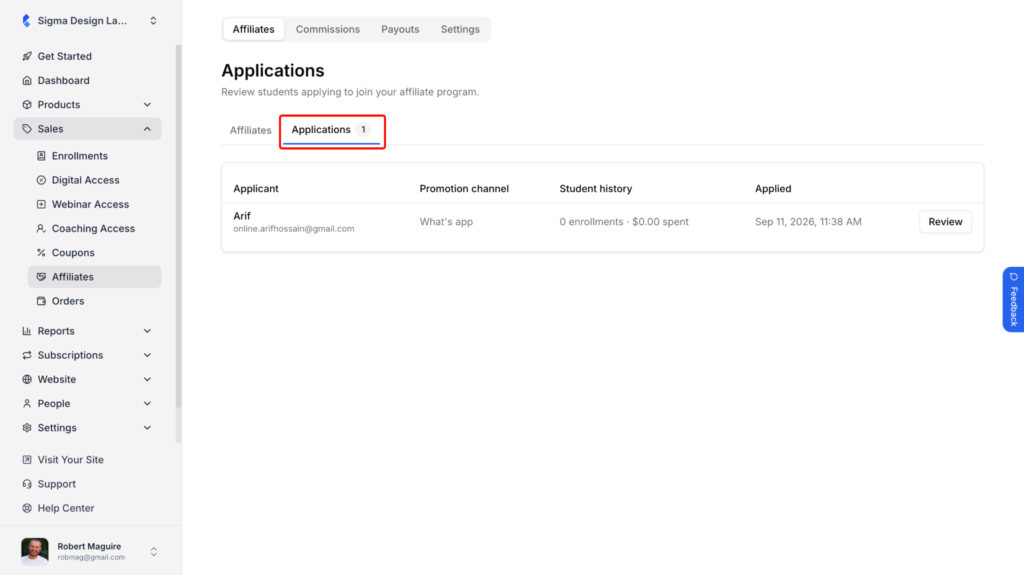
2. Click Review next to the applicant.
3. Check their answers and their history as a student. Then approve or reject.
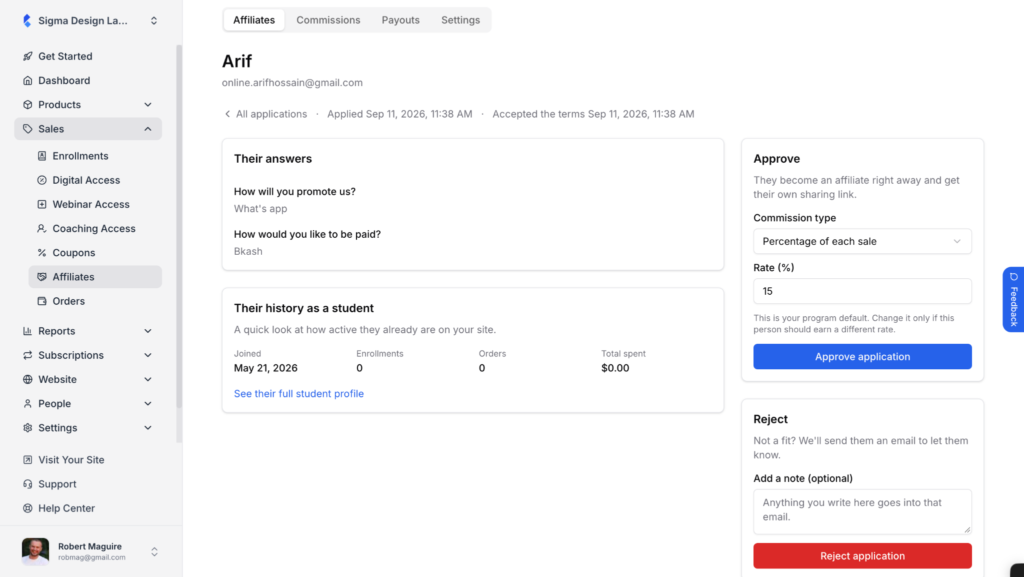
- Approve: The commission type and rate are filled from your program default. Change them only if this person should earn a different rate. Click Approve application.
- Reject: Add an optional note and click Reject application. Klasio emails the student, and your note goes into that email.
Manage affiliates
From the admin dashboard, go to Sales and click Affiliates. Each row shows the affiliate’s name, email, referral code, status, tags, clicks, conversions, earnings, and join date. Use the filter tabs to sort by status.
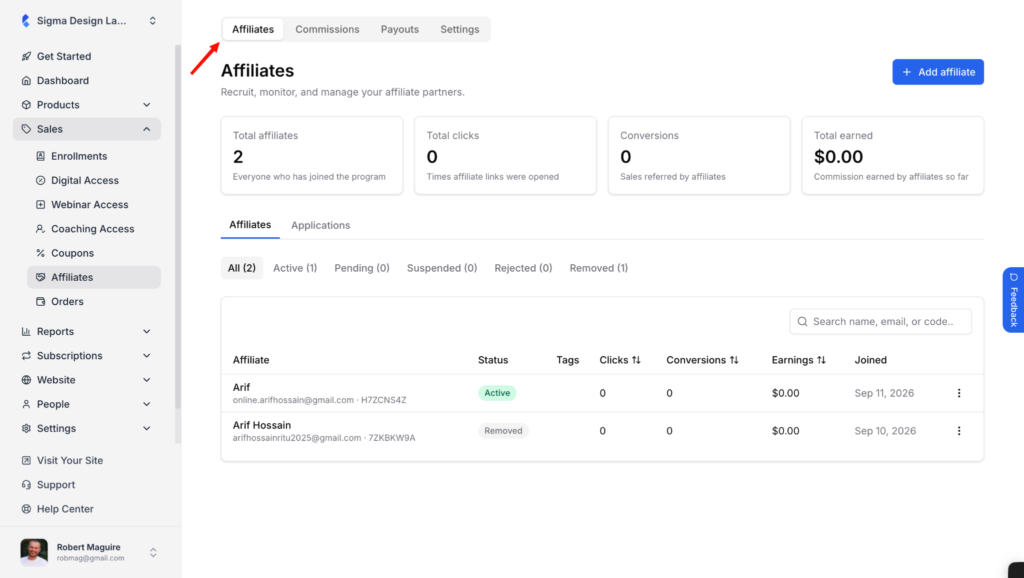
- Active: Their link is live and earning.
- Pending: Applied but not yet reviewed.
- Suspended: Paused. Their link does not earn.
- Rejected: Application declined.
- Removed: Taken out of the program.
Click the three-dot menu at the end of a row to manage that affiliate.
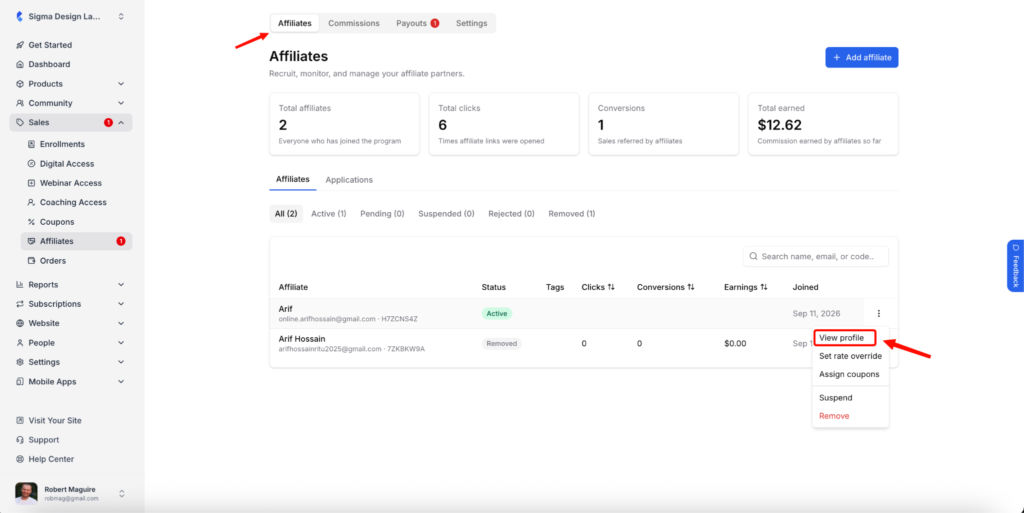
- View profile: Open the affiliate’s details.
- Set rate override: Give this affiliate a rate different from the program default.
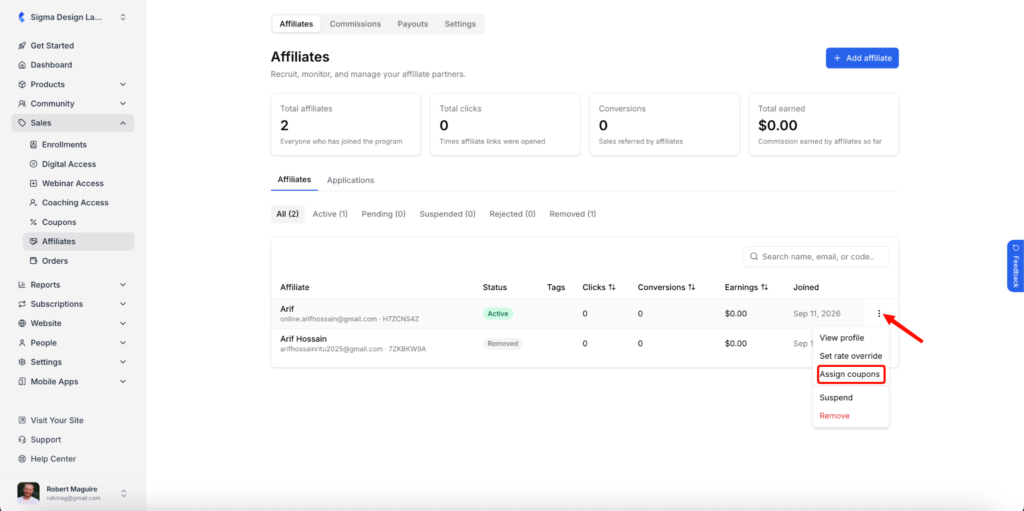
- Assign coupons: Choose which coupons this affiliate can attach to their link. See the next section.
- Suspend: Pause the affiliate. Their link stops earning until you reactivate them.
- Remove: Take the affiliate out of the program.
Assign a Coupon to an Affiliate
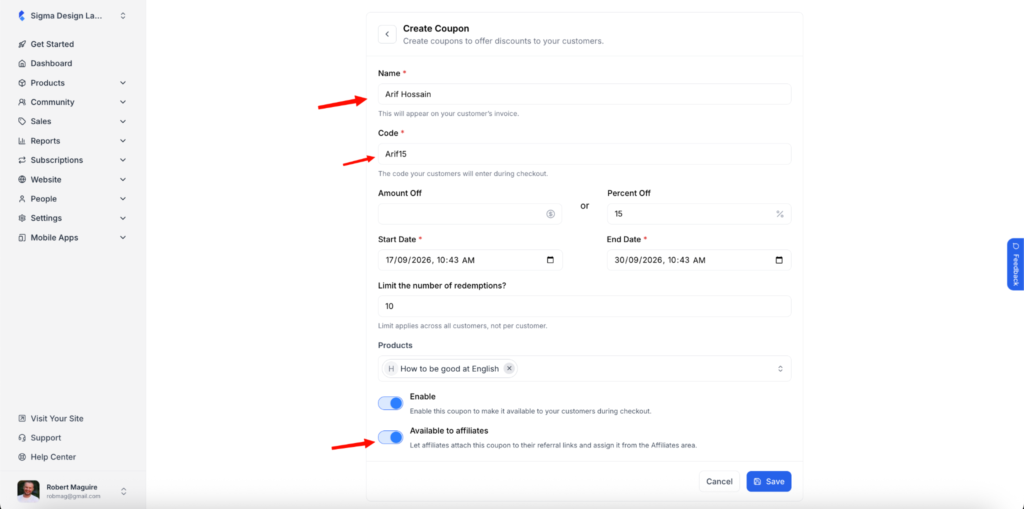
Affiliates can attach a coupon to their referral link so the discount applies automatically at checkout. First mark the coupon as available to affiliates, then assign it.
1. From the admin dashboard, go to Sales, click Coupons, and create or edit a coupon. Turn on Available to affiliates and click Save.
2. Go to Sales, click Affiliates, and click the three-dot menu next to the affiliate. Click Assign coupons.
3. Open the Select coupons dropdown and tick the coupons this affiliate can use. Only coupons marked as available to affiliates appear here.
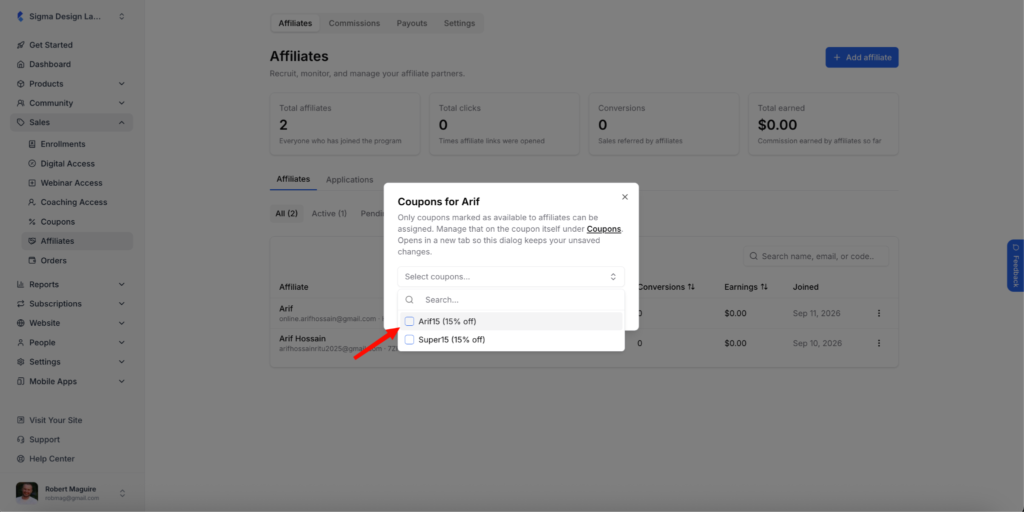
4. Check the worst-case box below the list. It shows the coupon discount plus the commission on one sale, and what you keep. Then click Save coupons.
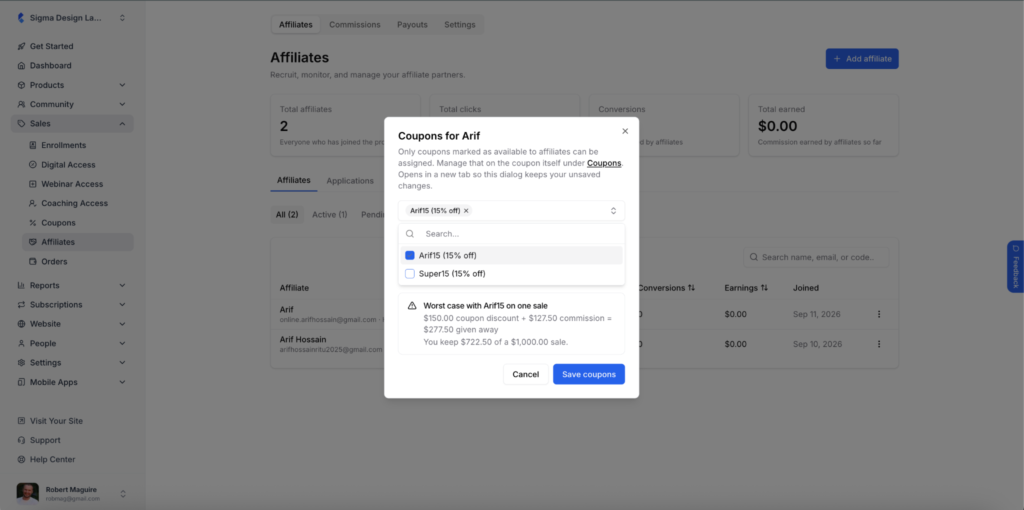
The coupon now appears in the affiliate’s Coupon dropdown on their dashboard.
Track Commissions and Record Payouts
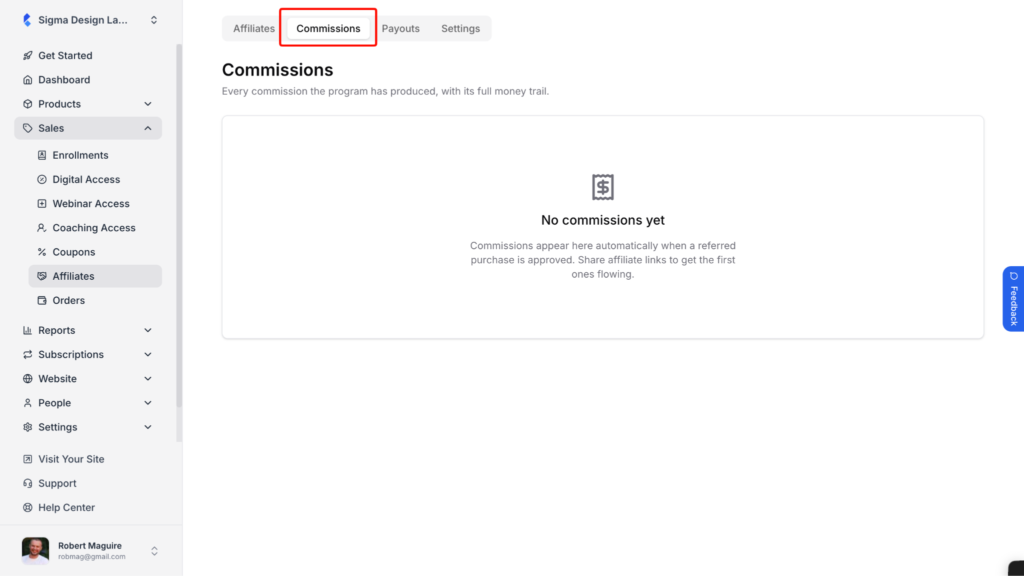
1. From the admin dashboard, go to Sales, click Affiliates, and open the Commissions tab. Commissions appear here automatically when a referred purchase is approved. If the order is refunded, the commission is reversed.
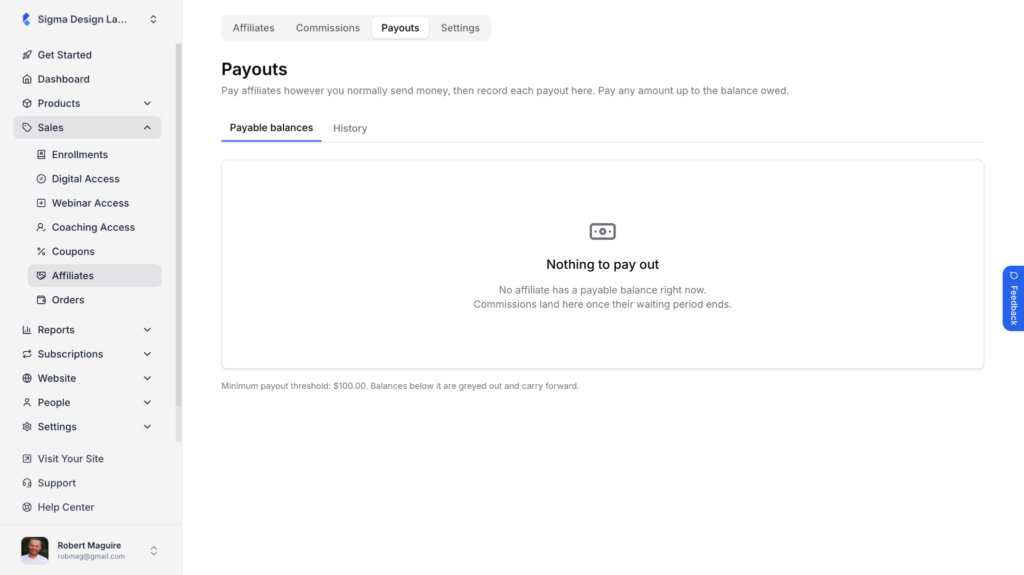
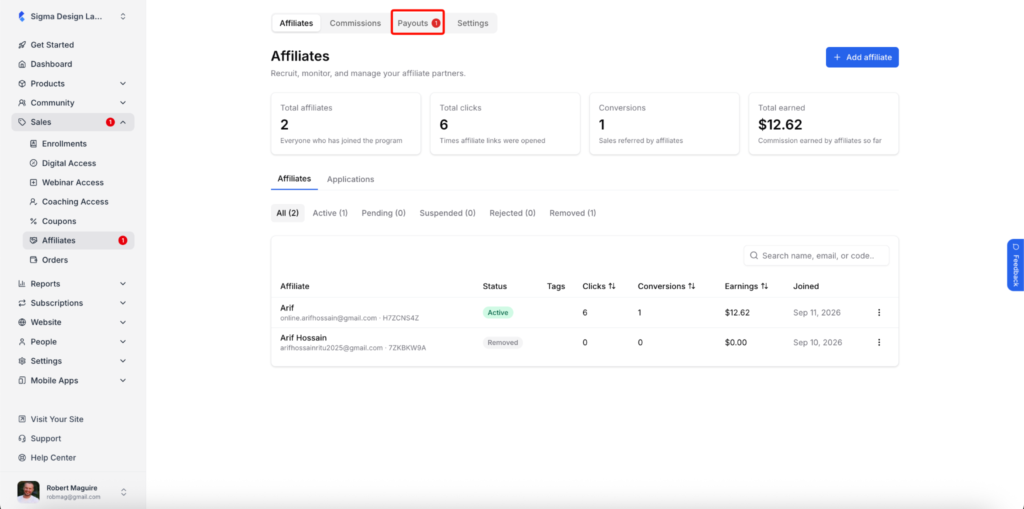
2. Open the Payouts tab. Once a commission passes the waiting period, it appears under Payable balances. When an affiliate requests a payout, a red badge shows on the Payouts tab and on the Sales and Affiliates menu items.
3. Pay the affiliate the way you normally send money, using the details from the payout form. Then record the payout in Klasio. You can pay any amount up to the balance owed.
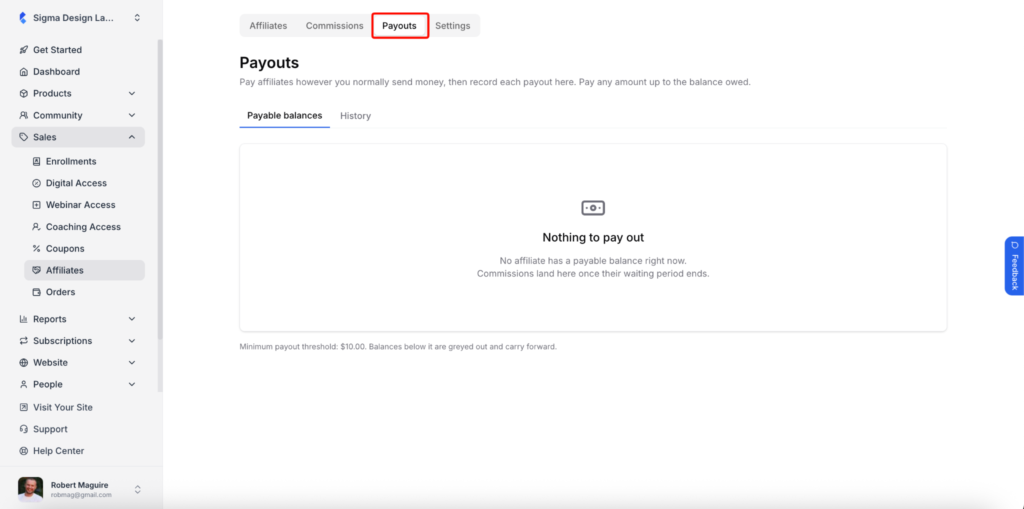
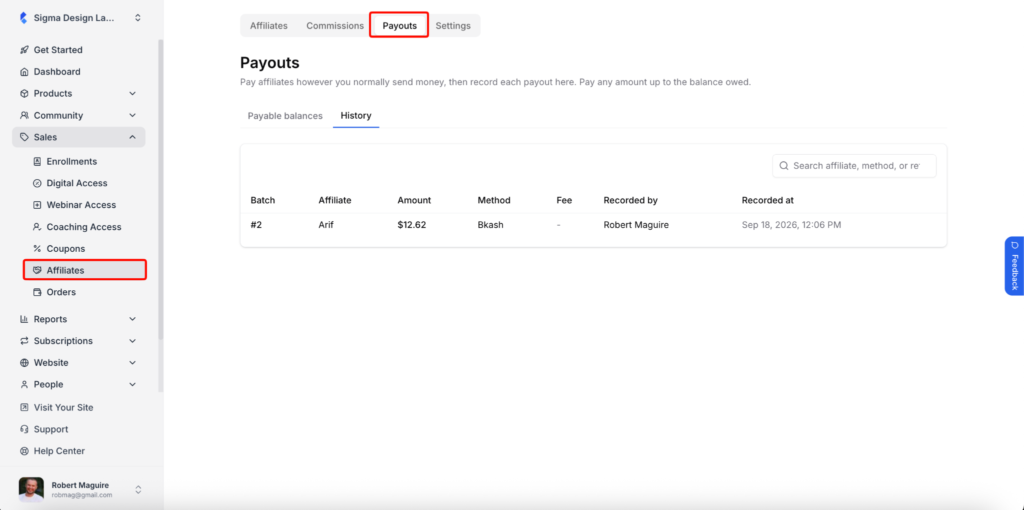
4. Enter the Amount you paid, the Method you used, such as bKash or bank transfer, and a Reference such as the transaction ID. Then confirm the payout. The affiliate gets the Affiliate Payout Completed email. Open the History sub-tab to see every payout you have recorded.
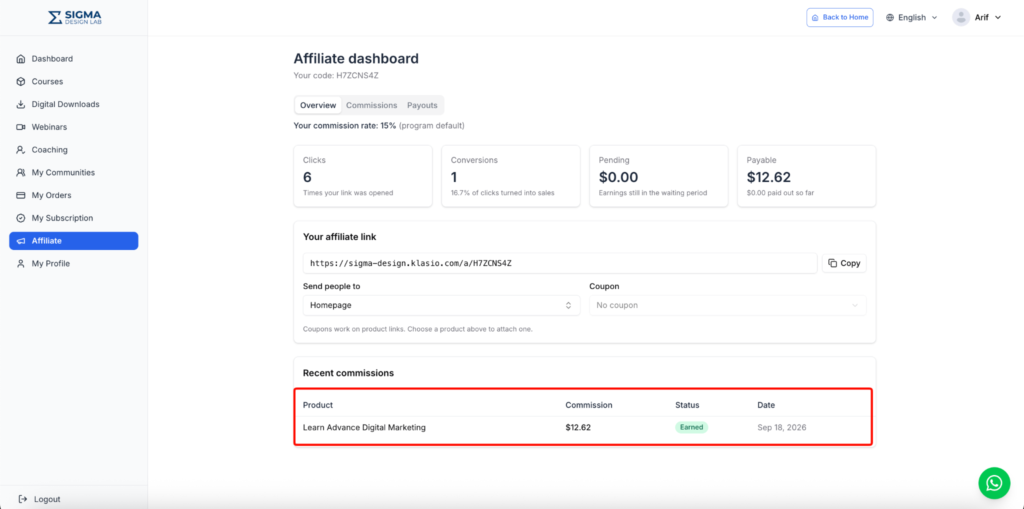
5. Verify it from the affiliate’s side. In their student dashboard, they open Affiliate and click the Payouts tab. The payout appears under Payout history with the amount, method, reference, and date. On the Overview tab, their Payable balance drops by the amount you paid, and the paid out so far figure updates.
Manage affiliate emails
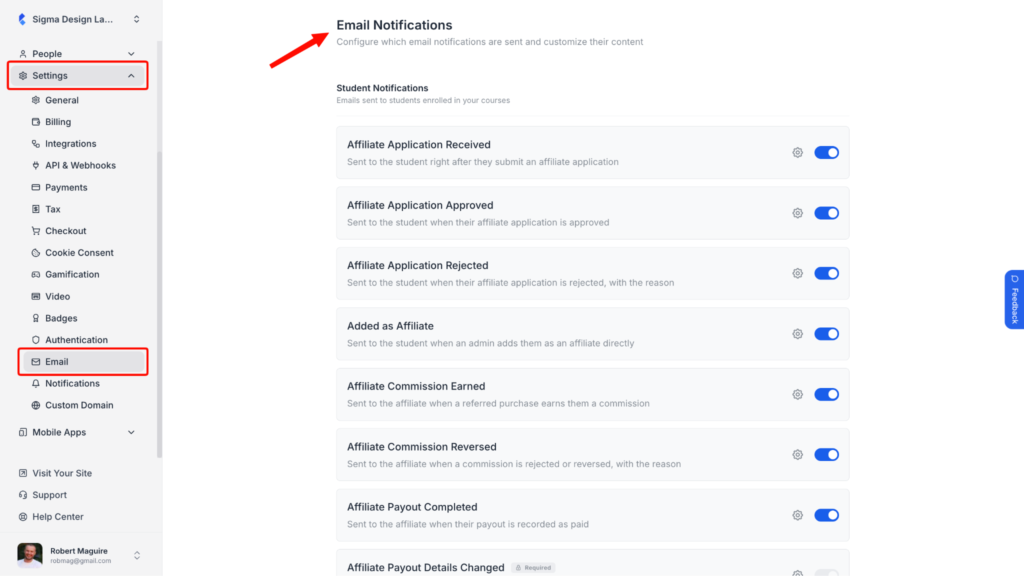
From the admin dashboard, go to Settings and click Email. The affiliate emails are listed under Student Notifications. Use the toggle to turn one off, or click the gear icon to edit its content.
Add the Affiliate Banner to Your Homepage
1. From the admin dashboard, go to Website, click Templates, and click Customize on your active template.
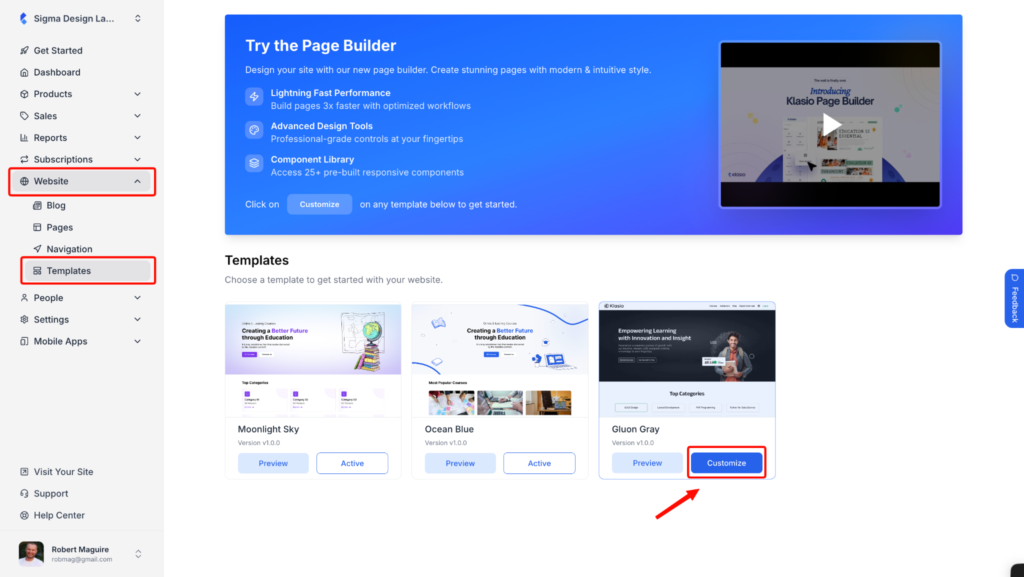
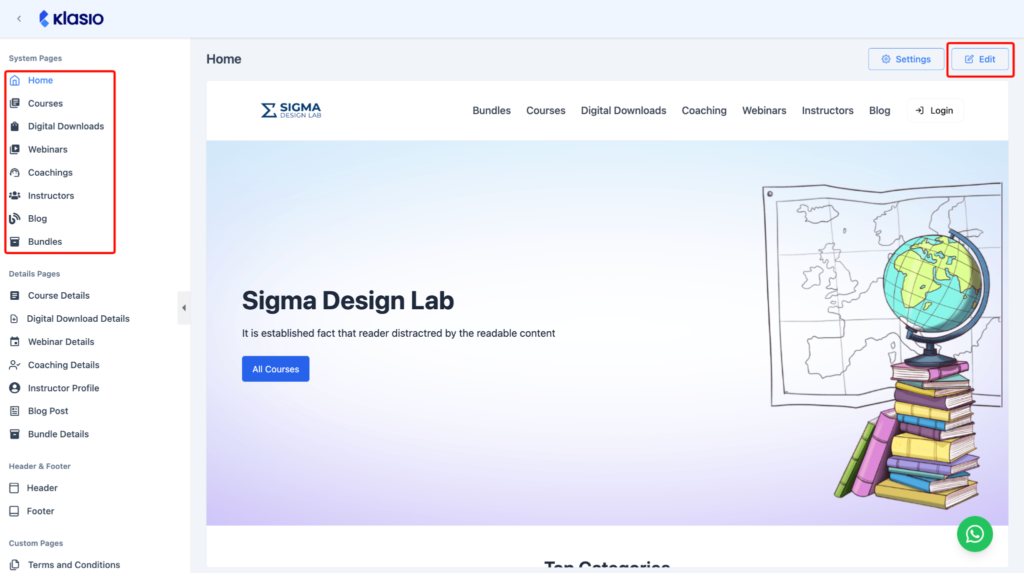
2. Select the page you want show the Affiliate CTA. Then Click Edit.
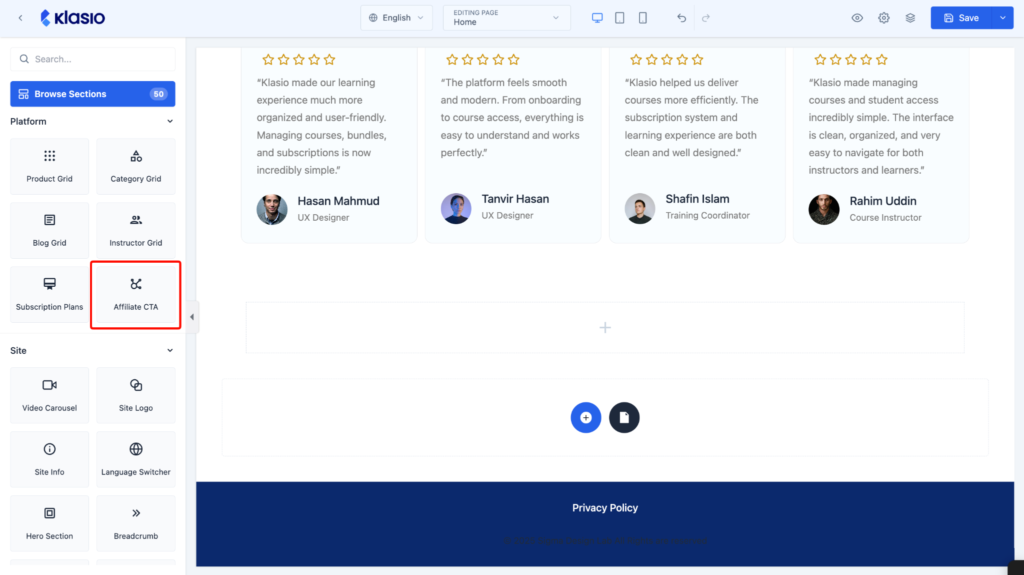
- Pick the Affiliate CTA preset from the left panel.
Drag the section where you want it. Use Image and Content to change the text and picture, and Style to change colors and spacing. Then click Save.
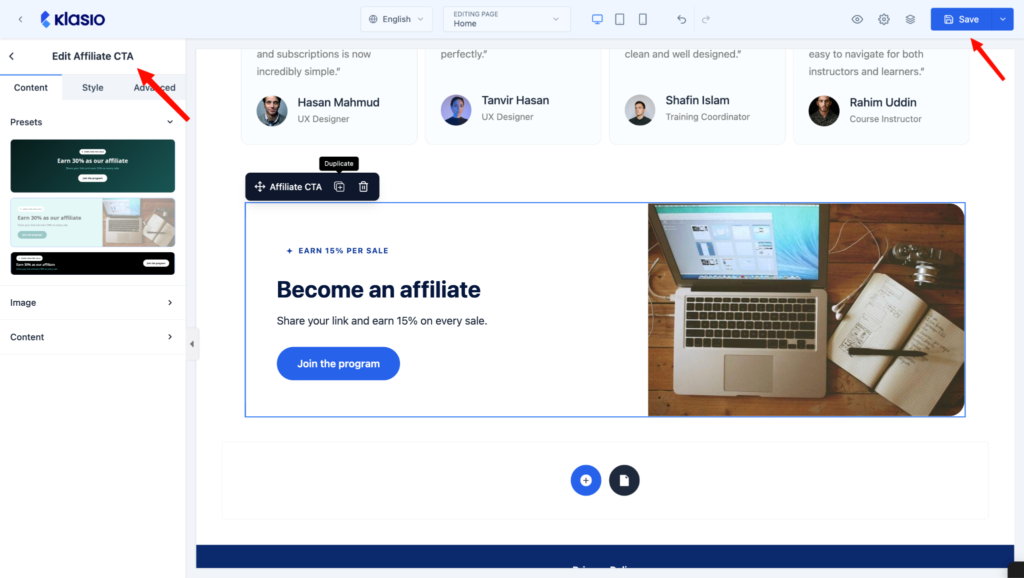
The banner shows your current commission rate, and the Join the program button takes visitors to your join page.
What Affiliates See
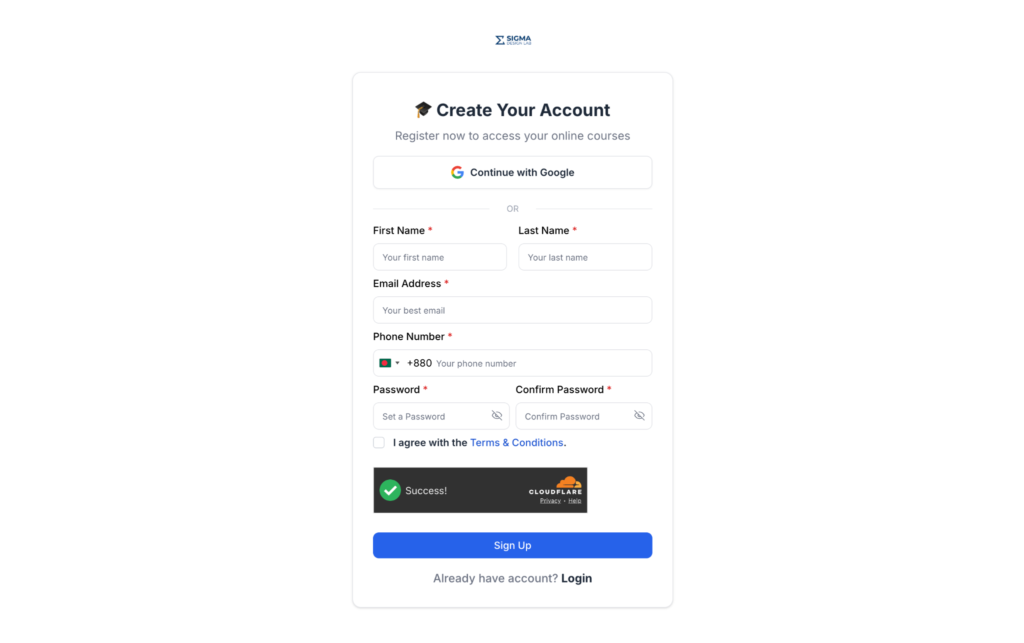
1. A student clicks Join the program on your site or opens your join link. If they are not logged in, they create an account first.
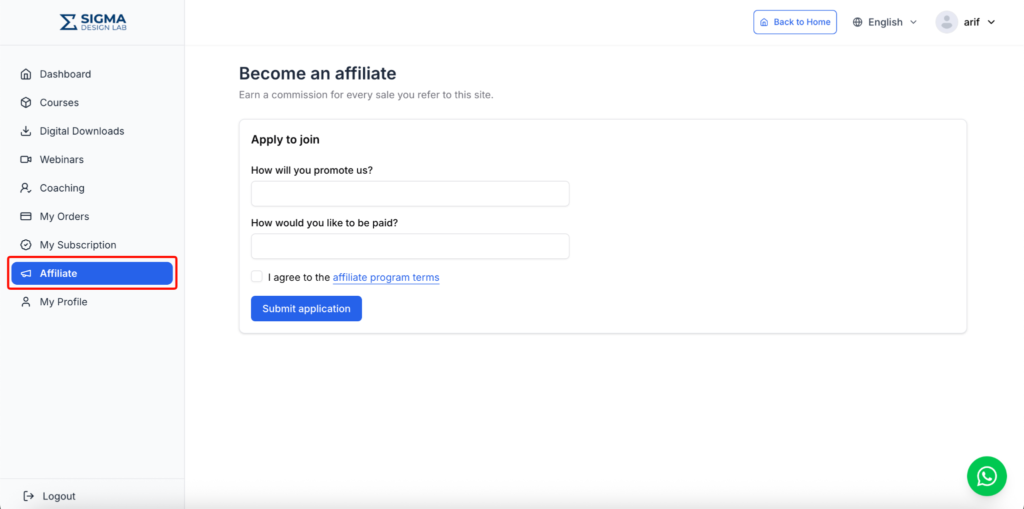
2. In their student dashboard, they click Affiliate in the left menu. The Become an affiliate page shows your application questions and a checkbox to accept the terms. They click Submit application.
3. Once approved, the Affiliate menu opens their Affiliate dashboard. It shows their referral code, commission rate, and three tabs.
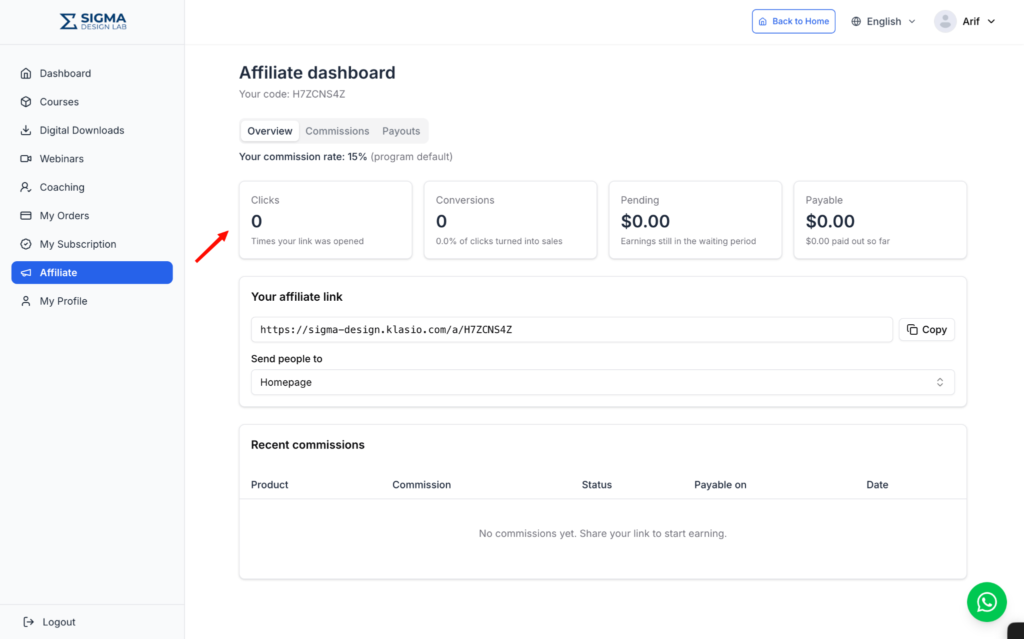
- Overview: Clicks, conversions, pending earnings, and payable earnings. Their affiliate link with a Copy button. The Send people to dropdown lets them point the link at a specific page. A Recent commissions table lists each commission with its status and payable date.
- Commissions: The full list of their commissions.
- Payouts: Their payout history and details.
Create a link for a specific product or coupon
By default the affiliate link sends people to your homepage. Affiliates can point it at one product and attach a coupon.
1. On the Overview tab, open the Send people to dropdown and pick a course, bundle, or digital download.
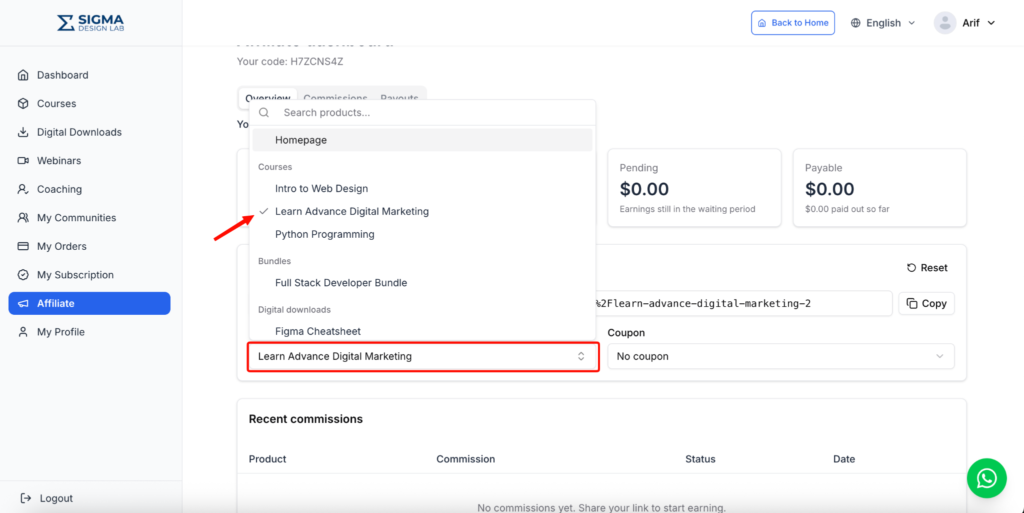
2. Open the Coupon dropdown and pick a coupon you have assigned to them. Coupons only work on product links, so a product must be selected first.
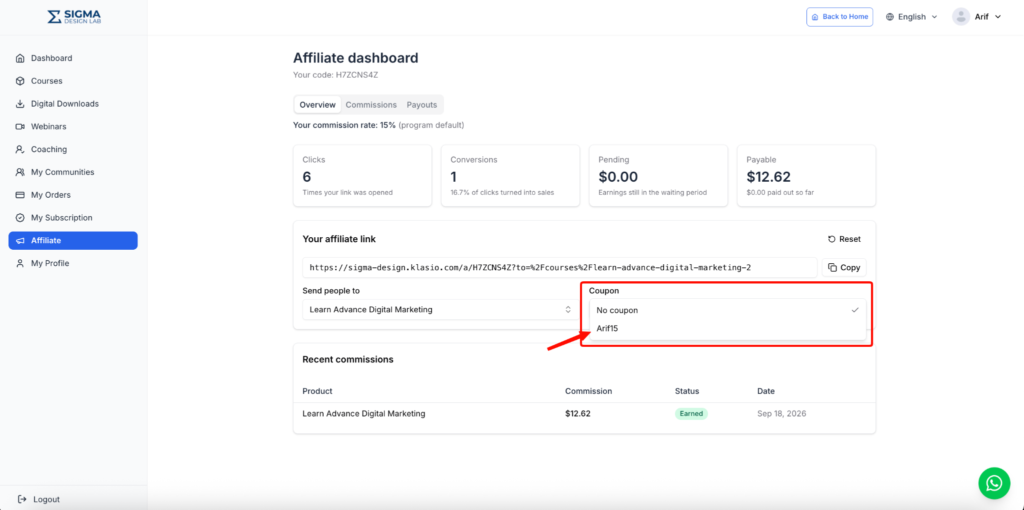
3. Click Copy. The link updates with the product and coupon, for example https://your-academy.klasio.com/a/CODE?to=%2Fcourses%2Fcourse-name&coupon=CODE15. The coupon is applied automatically at checkout. Click Reset to go back to the plain homepage link.
Below the dropdowns, affiliates see the coupon’s discount, remaining uses, end date, and the products it covers.
Request a payout
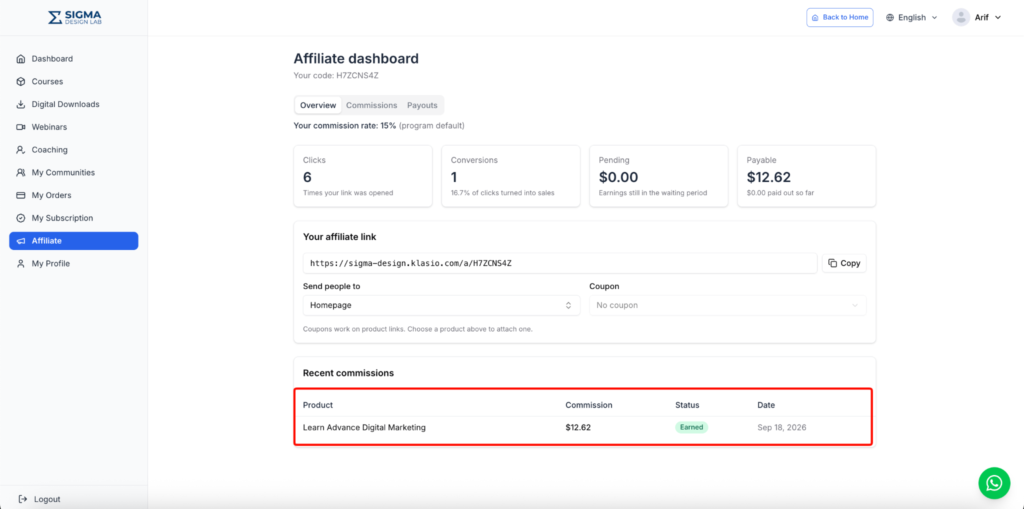
When someone buys through the affiliate’s link, the commission appears in Recent commissions with the status Earned. Once the waiting period ends, it moves to their Payable balance.
1. The affiliate opens the Payouts tab. Under Payout details, they fill in the fields you set in the Payouts form and click Save payout details. They get an email each time these details change.
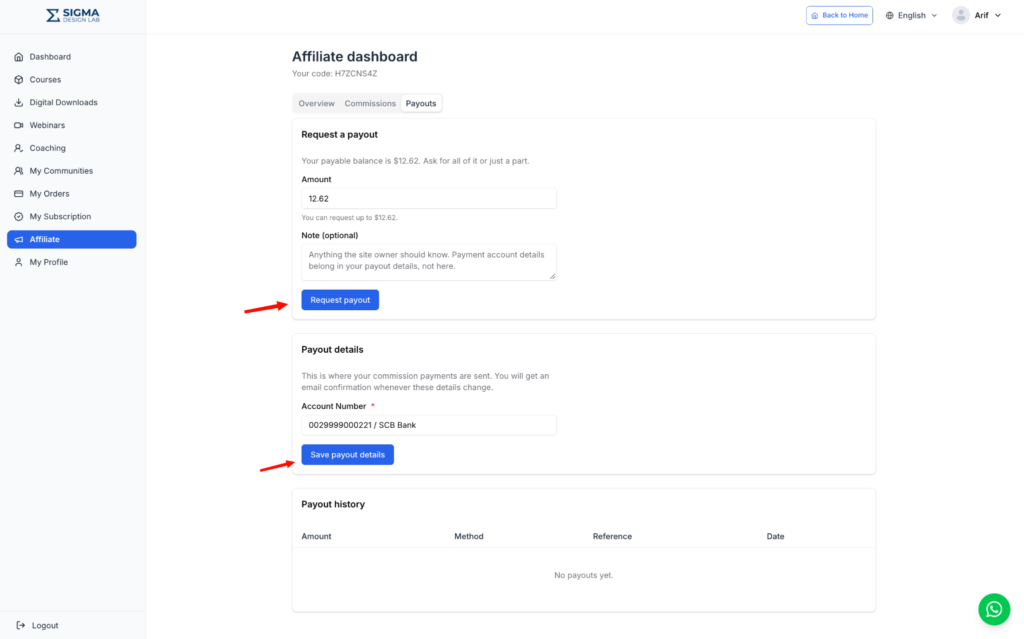
2. Under Request a payout, they enter an Amount up to their payable balance, add an optional Note, and click Request payout.
3. The request shows up on your Payouts tab. Once you pay and record it, it appears in the affiliate’s Payout history with the amount, method, reference, and date.
View Affiliate Analytics
1. From the admin dashboard, go to Reports and click Affiliate Analytics.
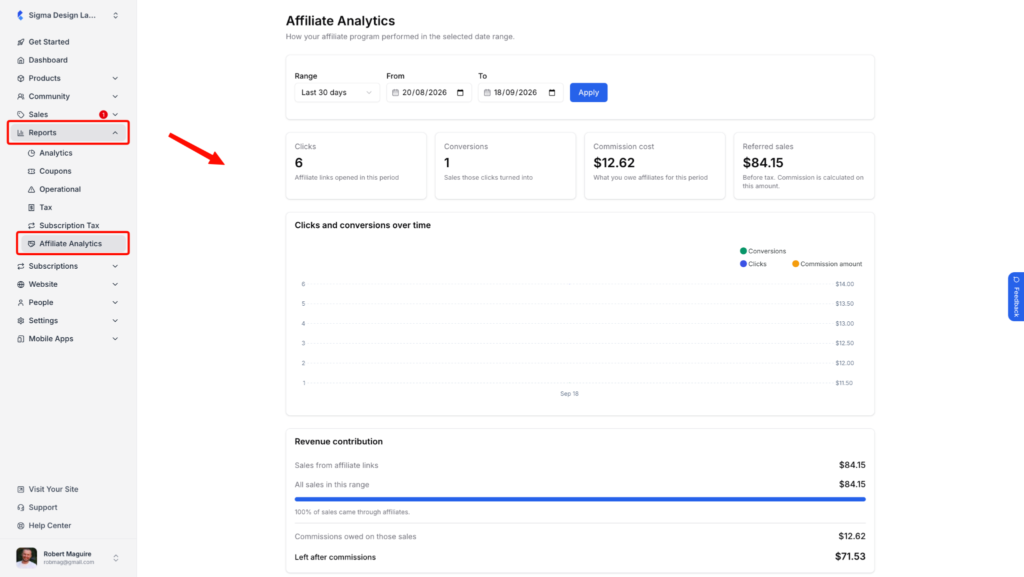
2. Choose a Range, or set From and To dates, and click Apply.
- Clicks: Affiliate links opened in this period.
- Conversions: Sales those clicks turned into.
- Commission cost: What you owe affiliates for this period.
- Referred sales: Revenue from affiliate sales before tax.
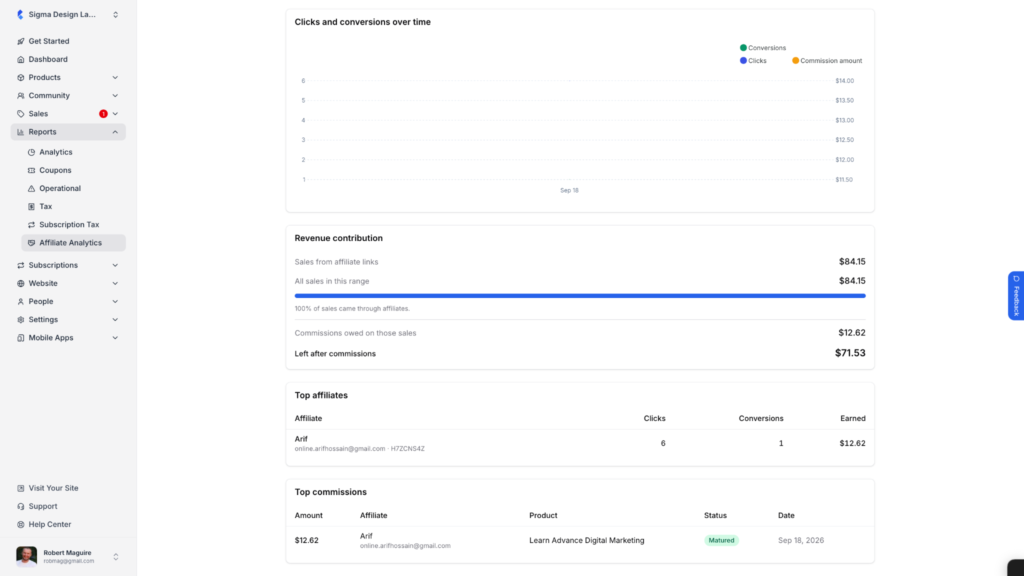
3. Scroll down to see the Clicks and conversions over time chart, the Revenue contribution block, Top affiliates, and Top commissions.