
Zapier is an automation tool that connects your apps so they can share data on their own. You build a workflow once, and Zapier runs it every time the right event happens. Zapier calls each workflow a Zap.
With Klasio’s Zapier integration, you can connect your academy to 8,000+ apps. You can trigger Zaps when something happens in Klasio, like a new enrollment or a finished course. You can also let Zaps create students in Klasio.
Every Zap has two parts:
- Trigger: The event that starts the Zap. For example, a student enrolls in one of your courses.
- Action: The task Zapier performs after the trigger. For example, it sends you an email.
Klasio can be the trigger, the action, or both. This guide walks you through three parts:
- Part 1: Connect Klasio to Zapier with an API token.
- Part 2: Use Klasio as a trigger. A new enrollment sends an email.
- Part 3: Use Klasio as an action. A form sign-up creates a student in Klasio.
Before You Start
Make sure you have these ready:
- A Klasio admin account.
- A Zapier account. You can sign up at zapier.com.
- At least one enrollment in your academy. Zapier needs sample data to test a Klasio trigger, so enroll a test student in a course before you build your first Zap.
Part 1: Connect Klasio to Zapier
First, create an API token in Klasio and use it to connect your academy to Zapier. You only need to do this once. Every Zap you build later uses this connection.
Step 01: Create an API Token in Klasio
Zapier needs an API token to connect to your Klasio account. Think of it as a password made only for Zapier.
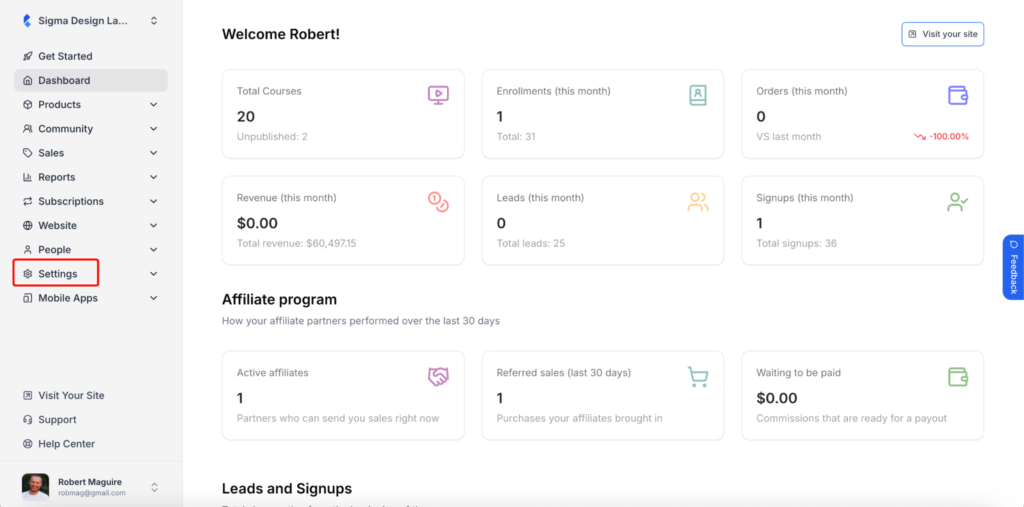
- Log in to your Klasio admin panel. In the left menu, click on Settings.
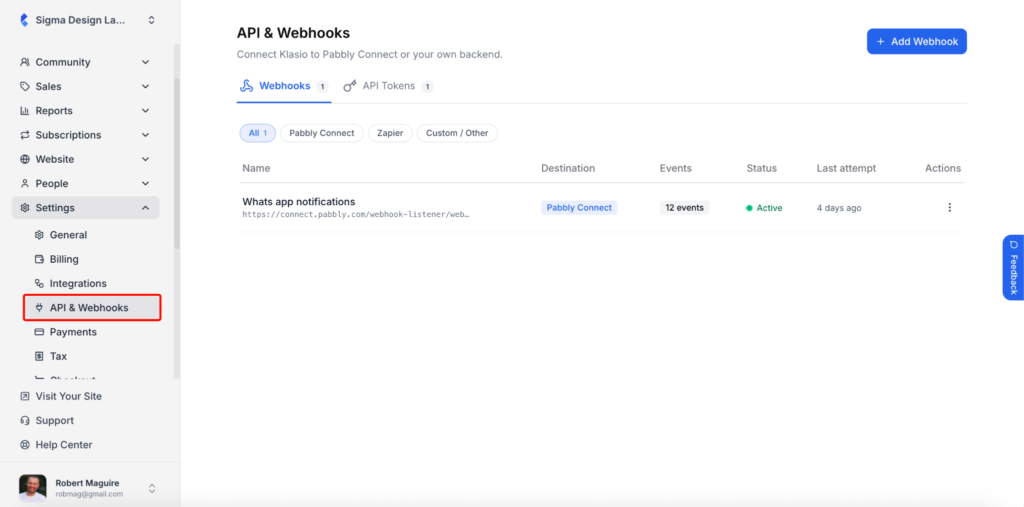
- From the Settings menu, click on API & Webhooks.
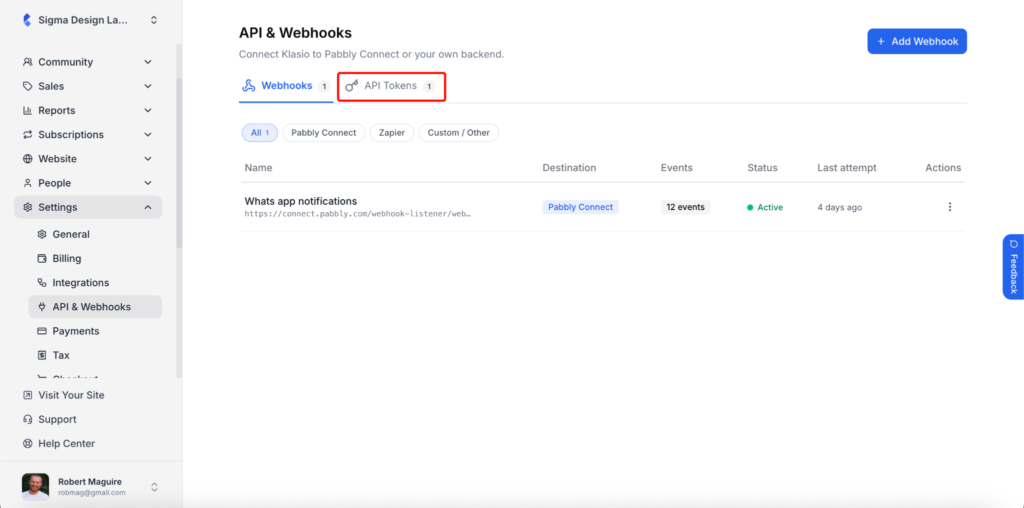
- This page manages Klasio’s API and webhooks. Open the API Tokens tab.
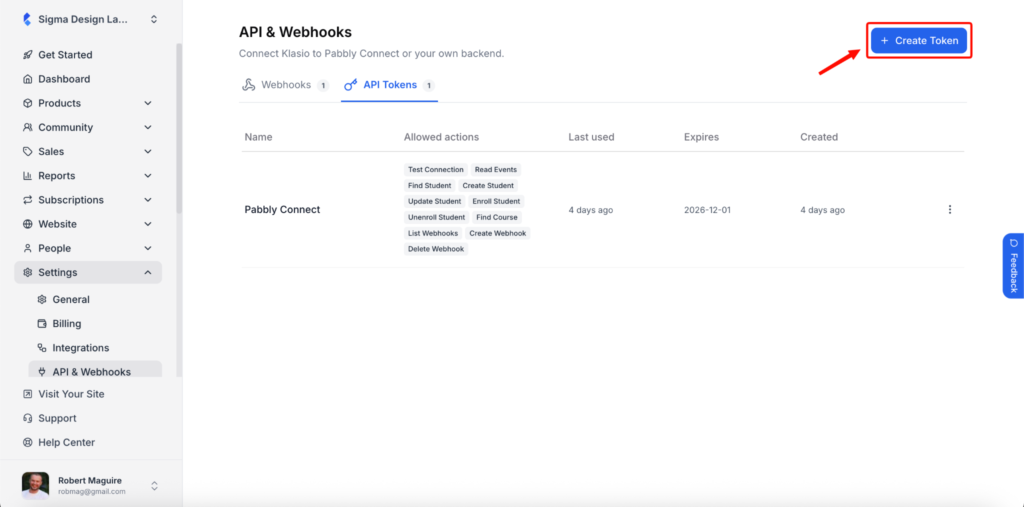
- Here you can see your existing tokens and what each one is allowed to do. Click on the Create Token button.
- A popup titled Create API Token will appear. Give the token a name that tells you what it is for, for example “Zapier”. Then, under Allowed actions, click on Full access so Zapier can both listen for events and create students. All 11 actions will be selected.
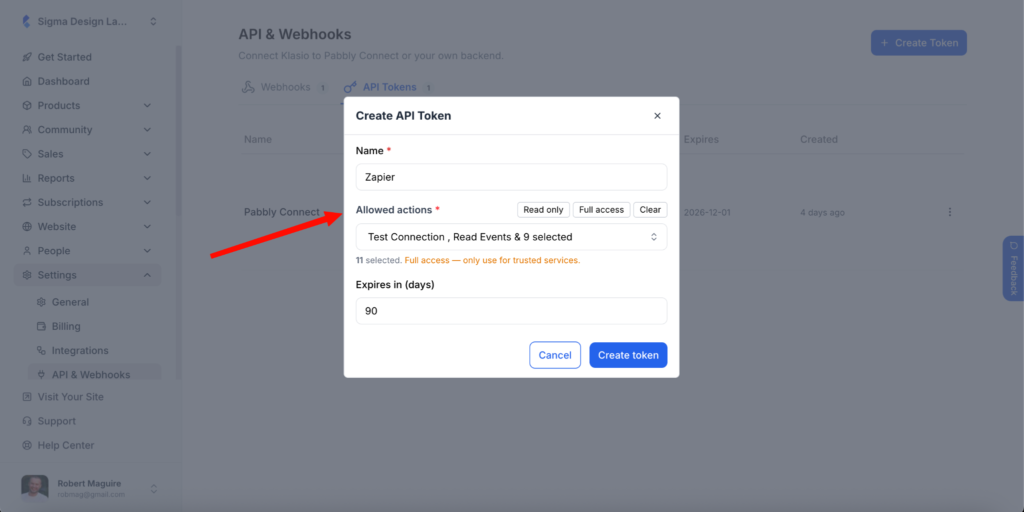
Note: Klasio shows a warning when you choose Full access: “only use for trusted services.” If you only need some actions, open the dropdown and pick them one by one instead.
- Leave Expires in (days) blank so the token never expires. Then click on Create token.
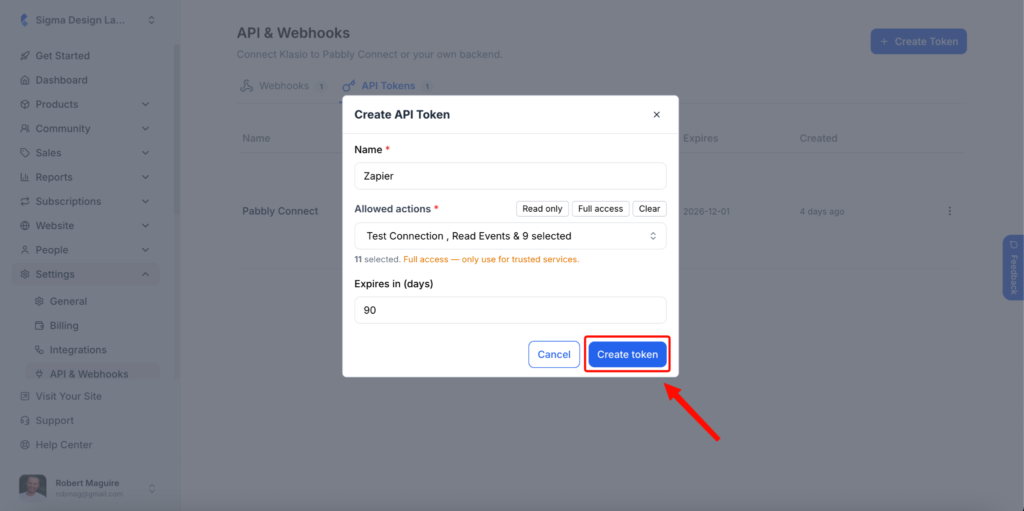
Full access selected, with Expires in (days) left blank
Note: If you set an expiry, your Zaps will stop working once the token expires.
- Your token is created. Klasio shows it only once, so click on Copy right away and keep it safe, like a password. If you lose it, you will need to create a new one.
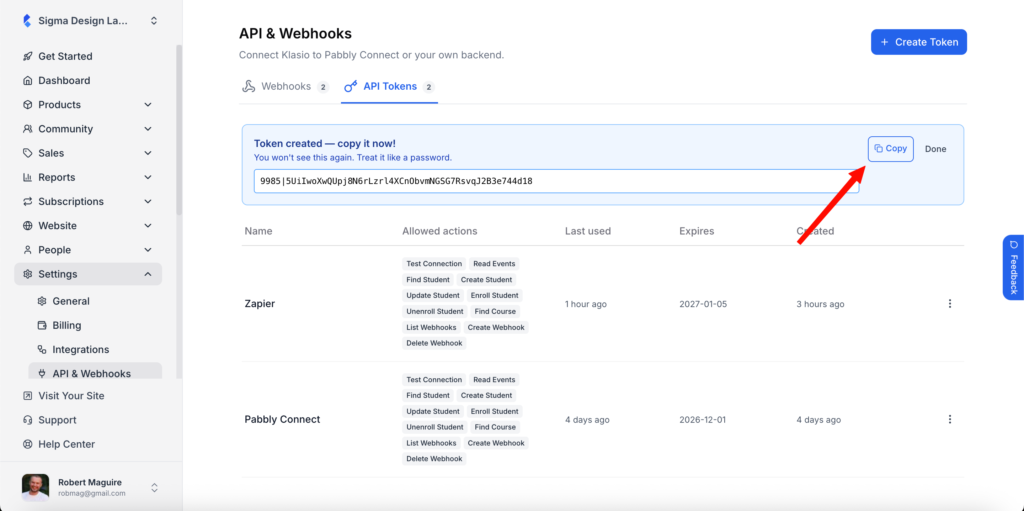
Step 02: Connect Klasio in Zapier
- Log in to your Zapier account. In the left menu, click on App connections.
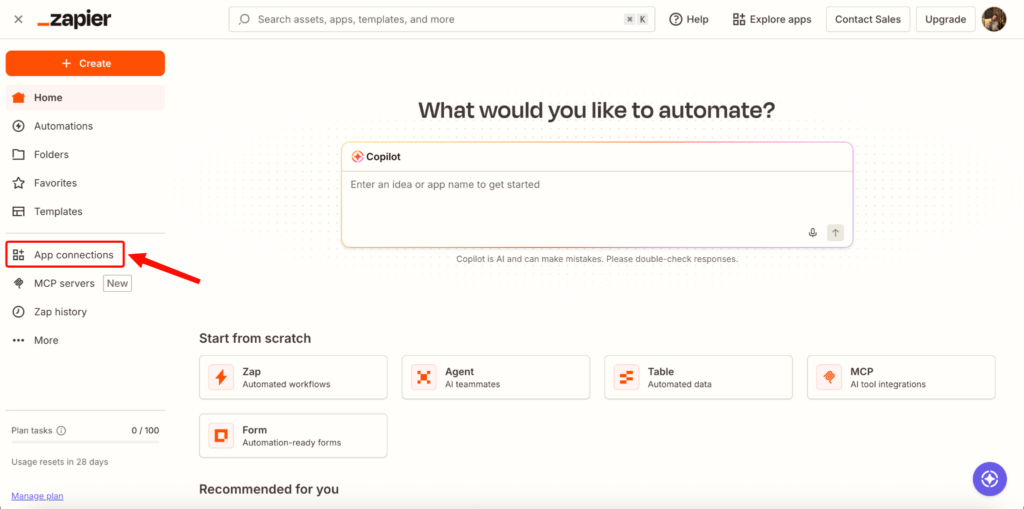
App connections in the Zapier menu
- Click on Create connection.
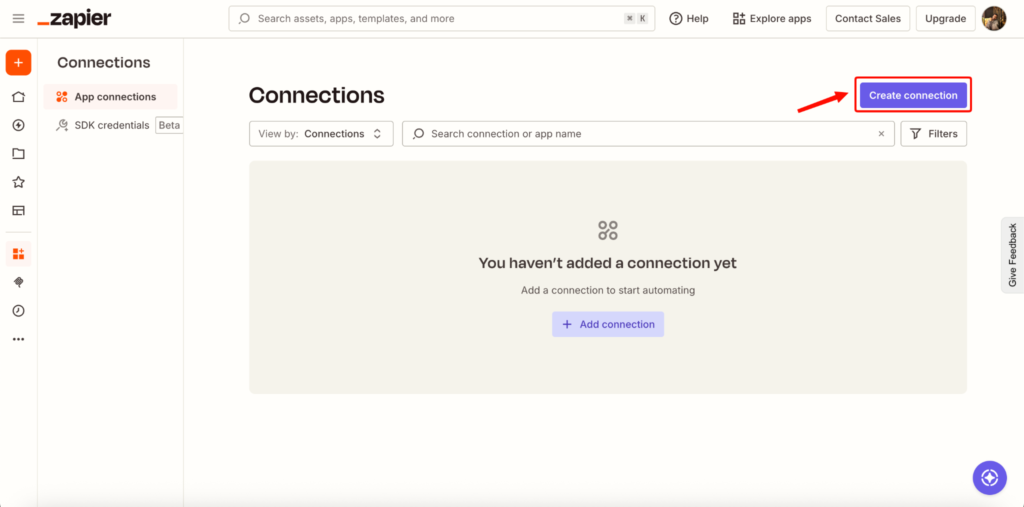
- In the Add new connection window, type “Klasio” in the search box. Then click on Klasio in the results.
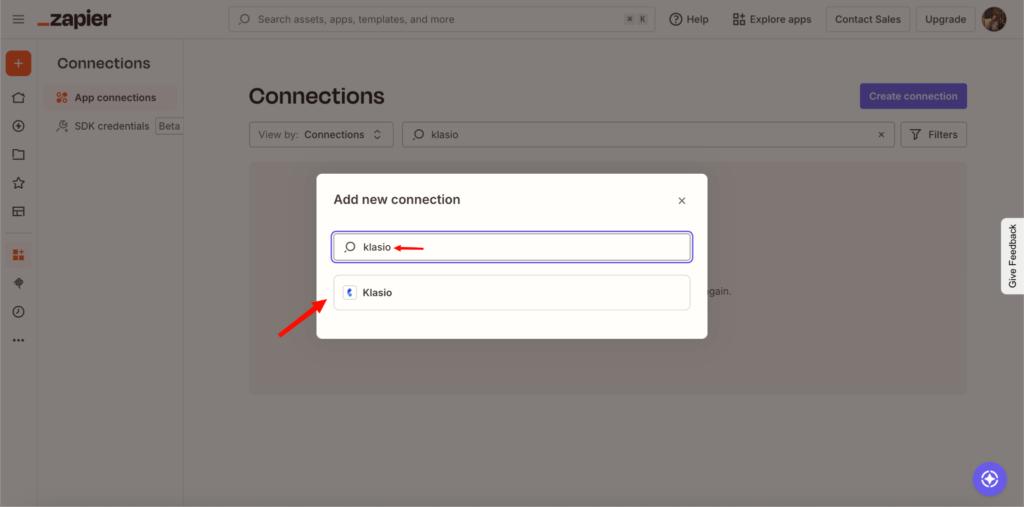
Searching for Klasio in the Add new connection window
- A Klasio sign-in window will open. Paste the API token you copied and click on Yes, Continue to Klasio.
Tip: Your token is a secret. Never share it in a chat or an email.
- The window closes, and your Klasio account now appears in the list with the status Connected.
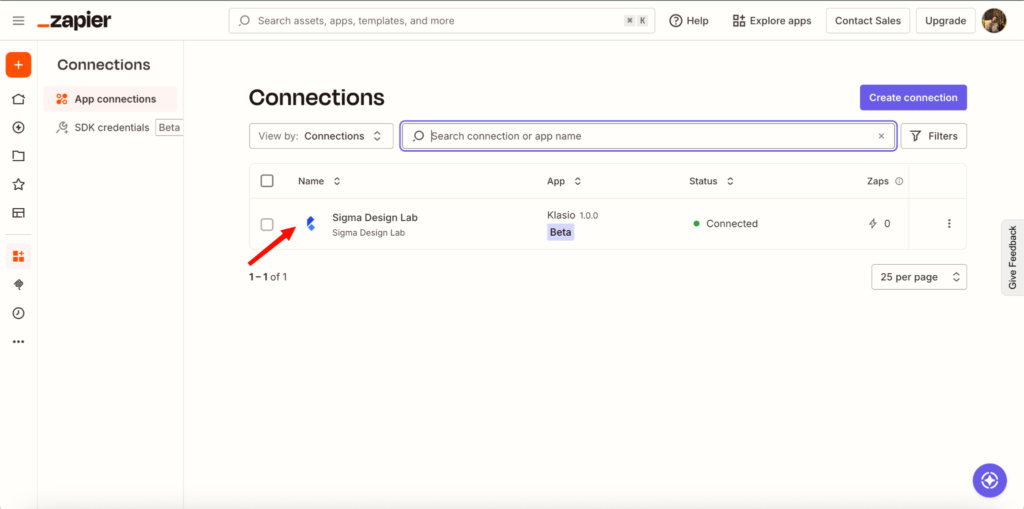
Klasio connected in Zapier
With this, Zapier can now talk to your Klasio academy.
Part 2: Use Klasio as a Trigger
In this part, Klasio starts the Zap. As an example, we will build a Zap that sends an email every time a student is enrolled in a course.
Step 03: Create a Zap with a Klasio Trigger
- In Zapier, click on the orange + Create button and choose Zaps.
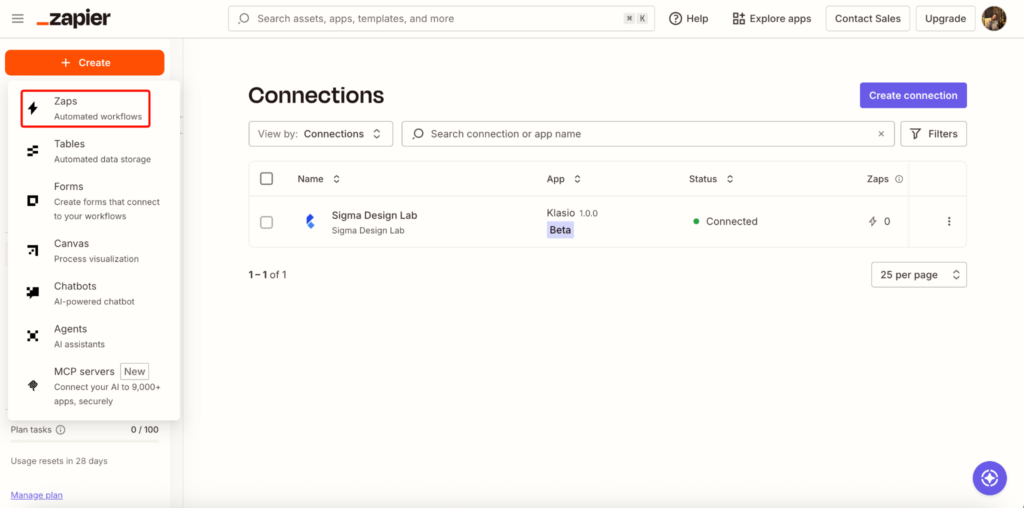
Creating a new Zap
- The Zap editor opens with two empty boxes. The Trigger is what starts the Zap, and the Action is what it does. Click on the Trigger box.
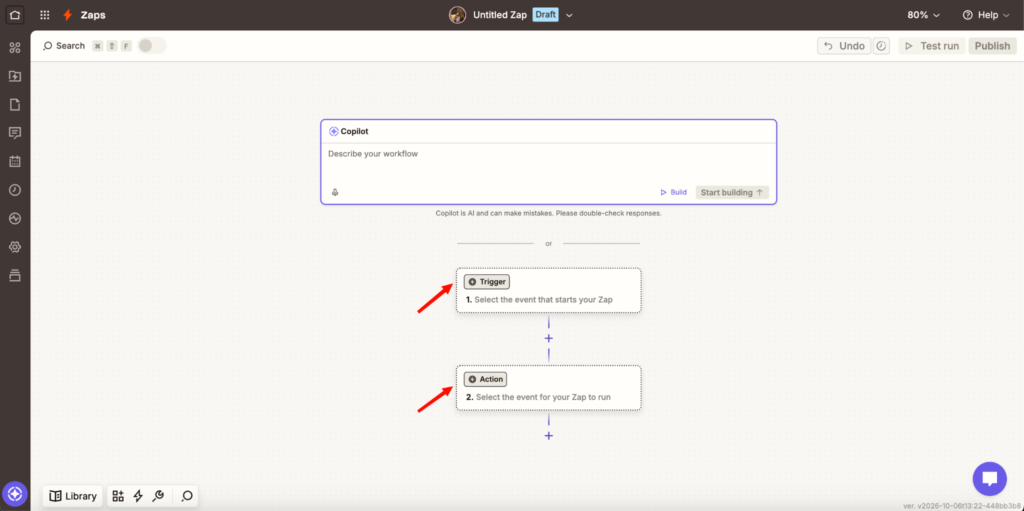
The Trigger box in the Zap editor
- A list of apps opens. Type “Klasio” in the search box and click on Klasio in the results.
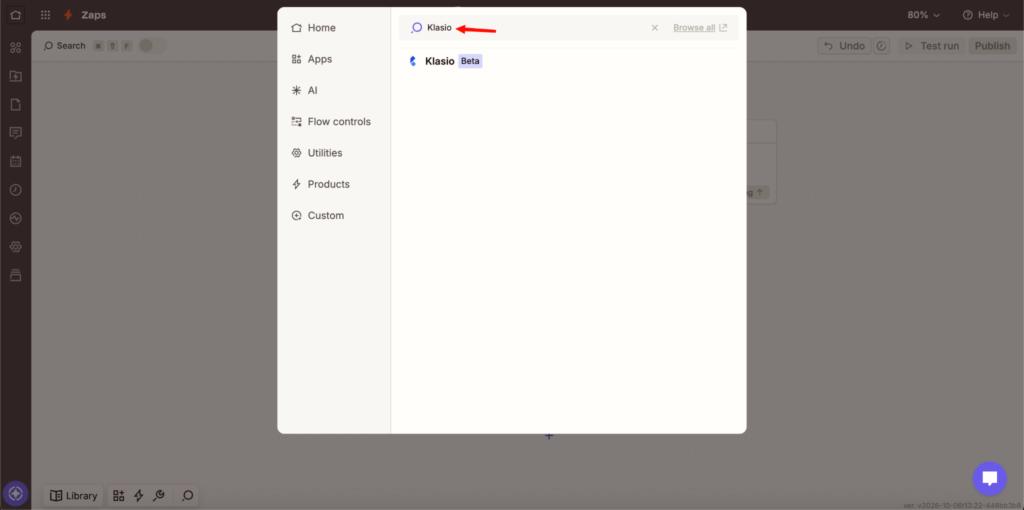
Choosing Klasio as the trigger app
- A setup panel opens on the right. Click on Trigger event to see all the Klasio events Zapier can listen to. Type “enroll” in the search box and choose New Enrollment. It fires the moment a student is enrolled in a course.
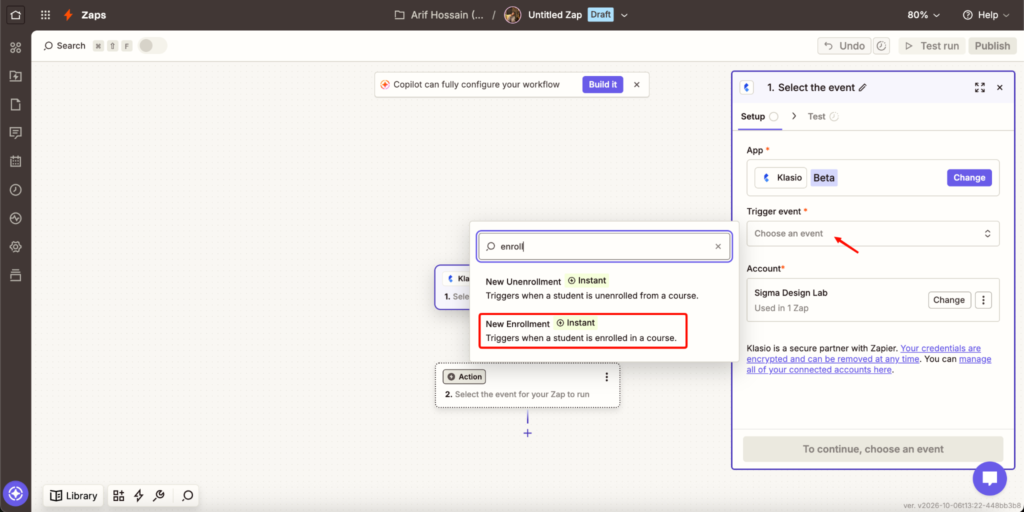
Choosing New Enrollment as the trigger event
Note: Events marked Instant are pushed from Klasio to Zapier right away.
- Under Account, click on Select and pick the Klasio account you connected in Part 1.
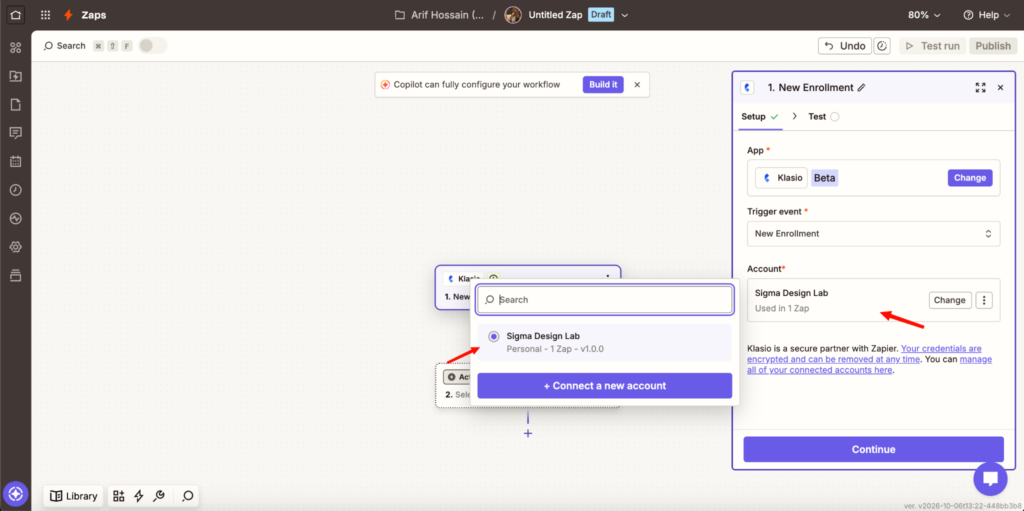
Picking your Klasio account
Tip: If you haven’t connected an account yet, click on + Connect a new account and paste your API token there.
- The app, trigger event and account are now set. Click on Continue.
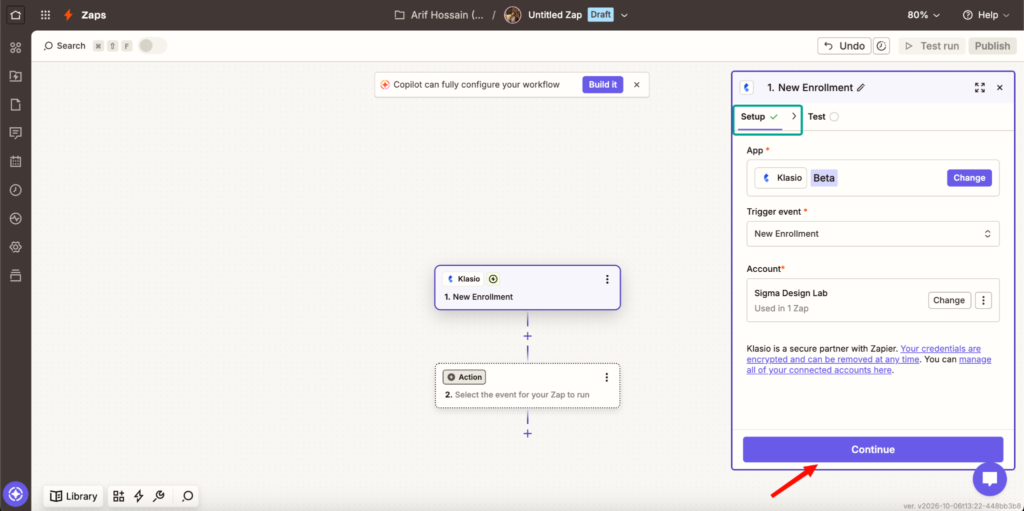
Trigger setup complete
Step 04: Test the Trigger
- Click on Test trigger. Zapier asks Klasio for a recent enrollment to use as sample data.
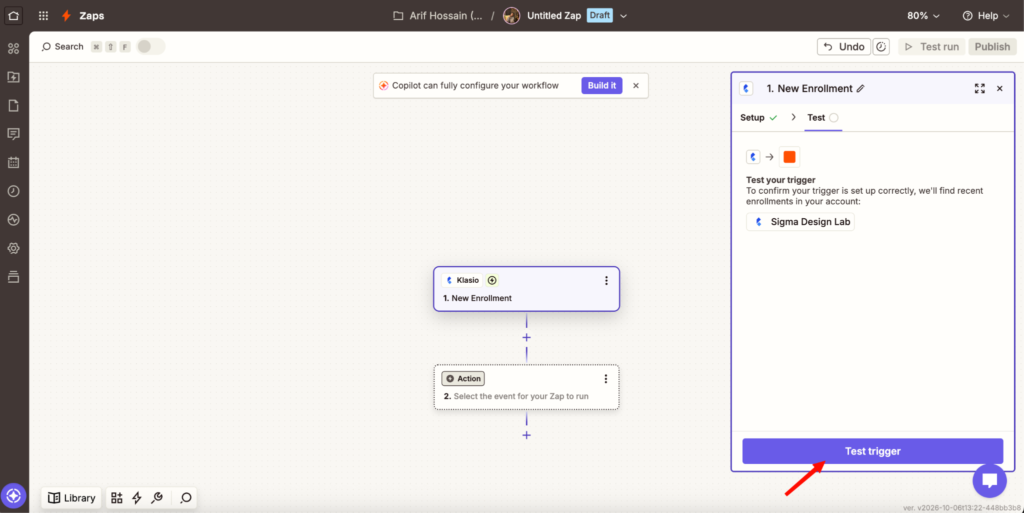
The Test trigger button
- Zapier will show a real enrollment from your academy. Click on it to see the data Klasio sends for every new enrollment: the cohort, the course, and the student’s name, email and phone. Then click on Continue with selected record.
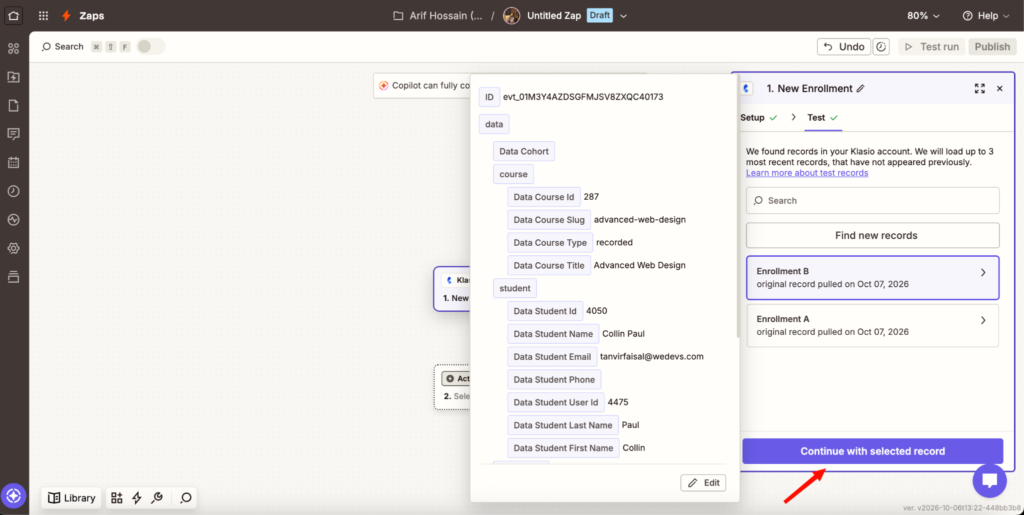
Sample enrollment data from Klasio
Step 05: Add an Email Action
- Zapier now asks for the action, which is what happens after each enrollment. Search for “Email” and click on Email (Email by Zapier). It is free and needs no extra account. You could also pick Gmail, Slack or Google Sheets here.
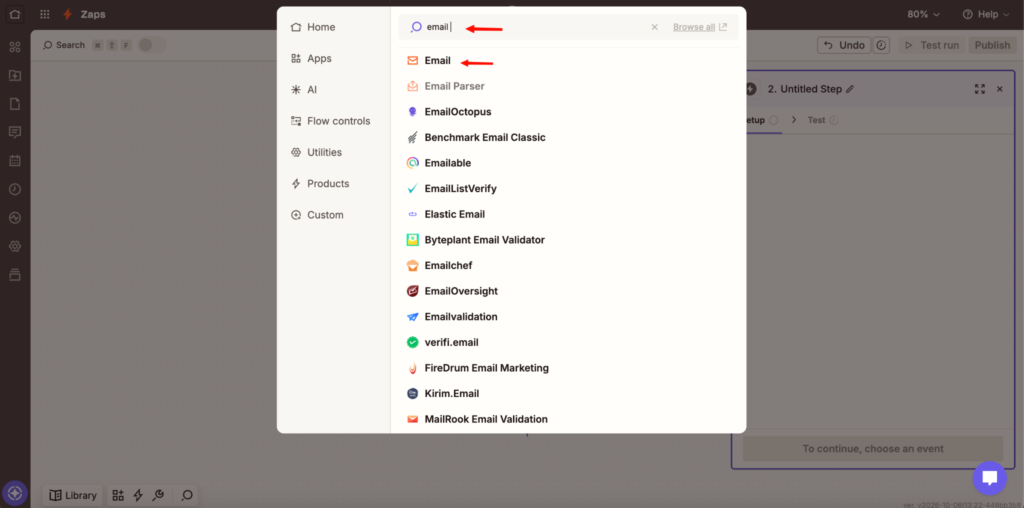
Choosing Email by Zapier as the action app
- Open the Action event list and choose Send Outbound Email. Then click on Continue.
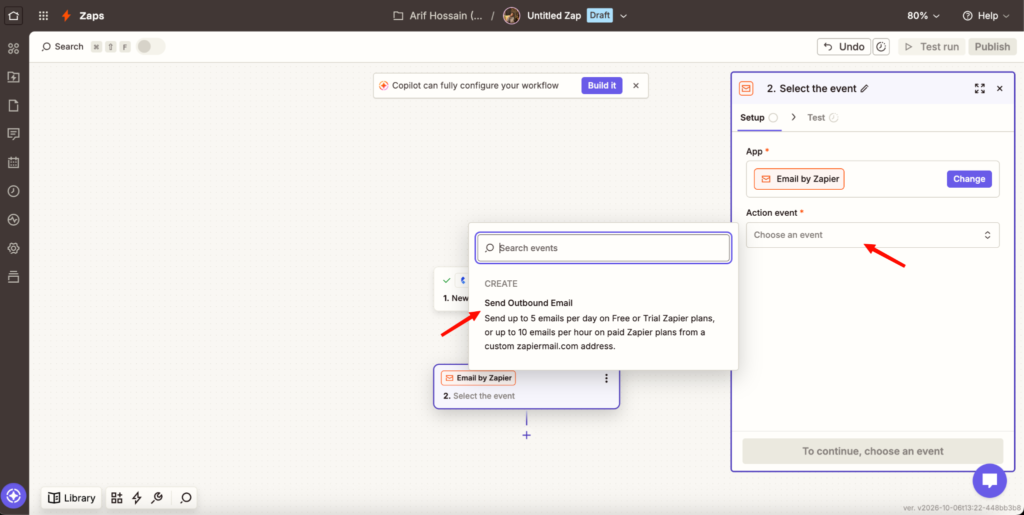
Choosing Send Outbound Email
Note: On Zapier’s free plan, Send Outbound Email can send up to 5 emails per day.
- In To, type the address that should receive the email, for example your team inbox.
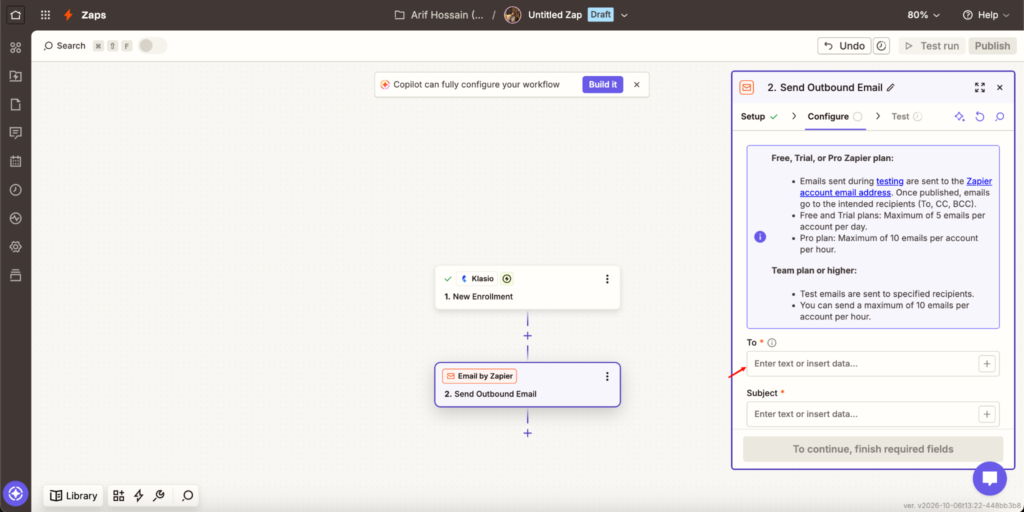
The To field
- In Subject, type “New enrollment:” and click on the + button at the end of the field. A list of Klasio fields opens with real example values next to them. Click on Data Student Name. Then type “joined” and insert Data Course Title the same way.
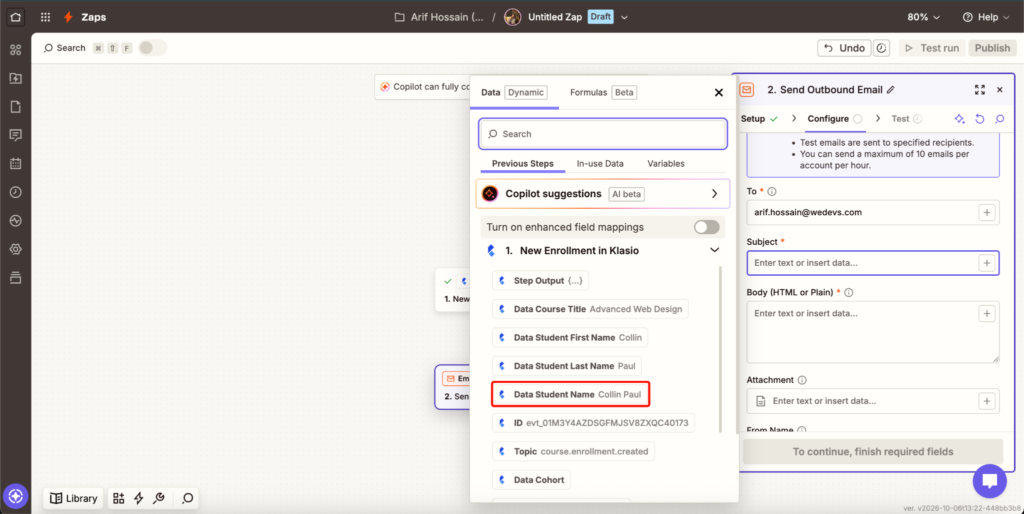
Inserting Klasio data into the subject line
- Click in the Body box and write your message. Use the + button again to insert the student name, course title and student email. Optionally, add a From Name so people know who the email is from. Reply To, CC and BCC are optional too. Then click on Continue.
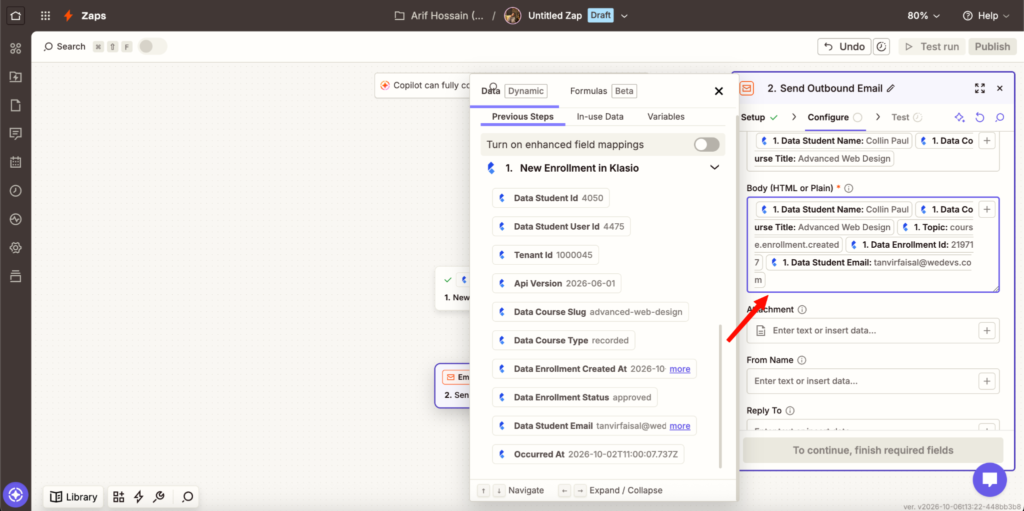
The email body with Klasio data, and the optional From Name
- Zapier shows a preview of the email with the real student and course filled in. Click on Test step to send a test email.
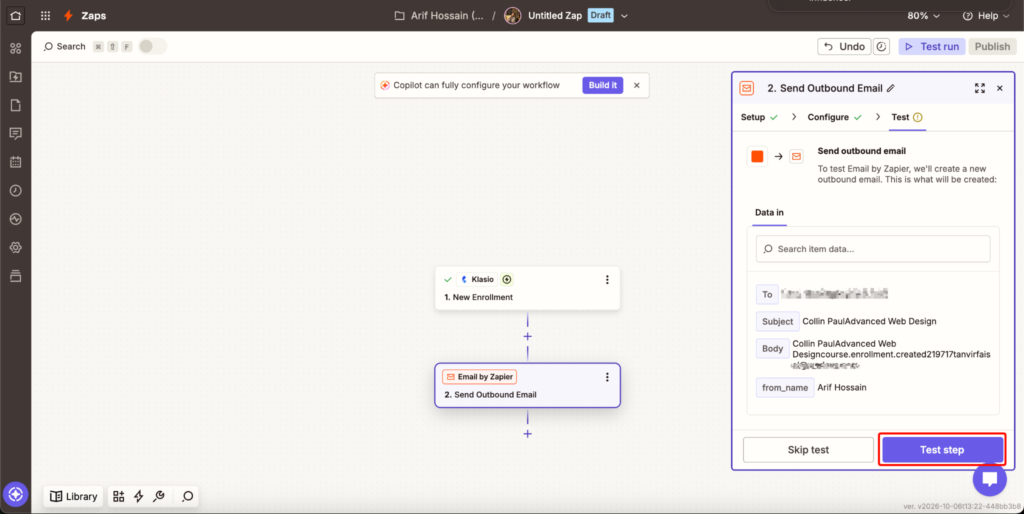
Previewing the email before the test
Note: On free plans, test emails go to your own Zapier account email, not to the address in To.
- The test has passed. Zapier confirms that an outbound email was sent.
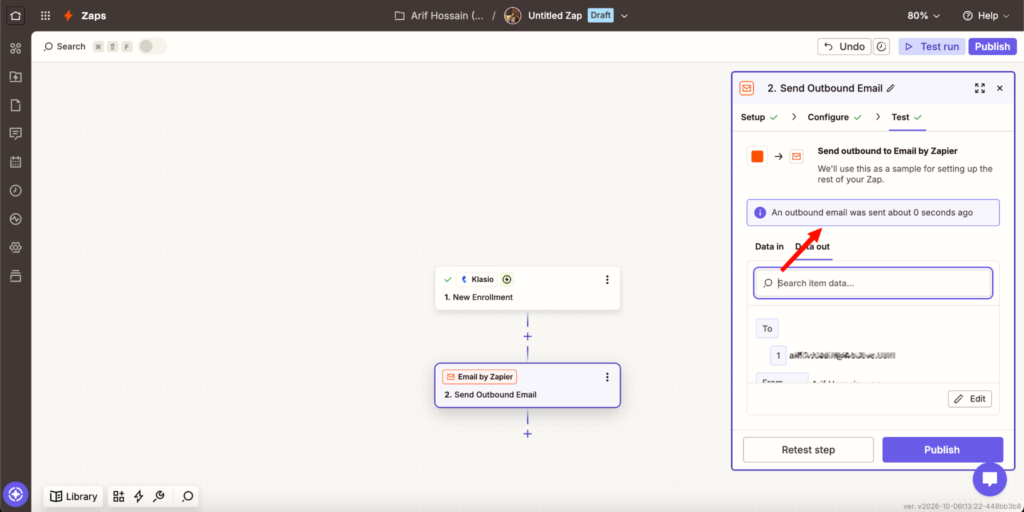
The test email was sent
Step 06: Name and Publish the Zap
- Before publishing, give the Zap a clear name. Click on the small arrow next to Untitled Zap at the top, then click on Rename. Type a name, like “Klasio new enrollment email alert”, and press Enter. Then click on Publish in the top-right corner.
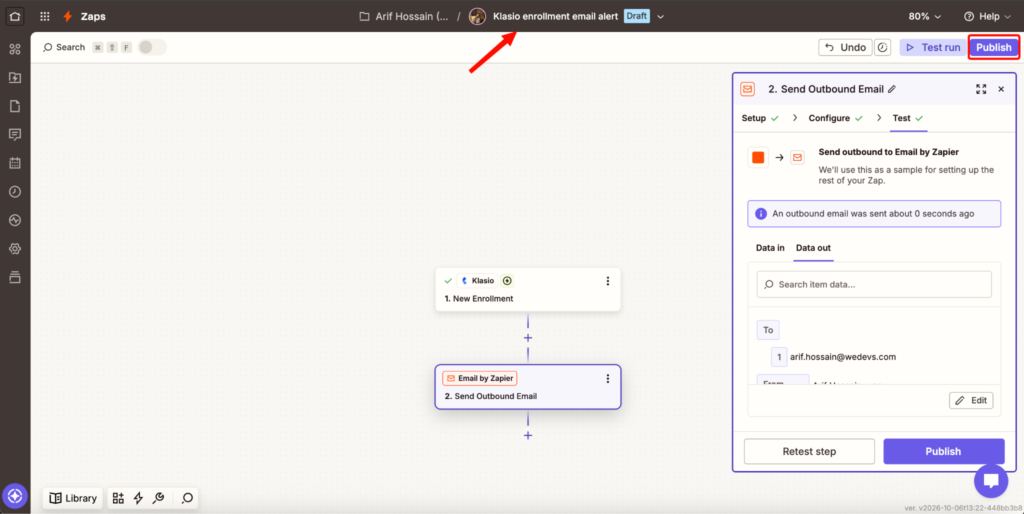
- Your Zap is live. From now on, it runs every time a student is enrolled in Klasio.
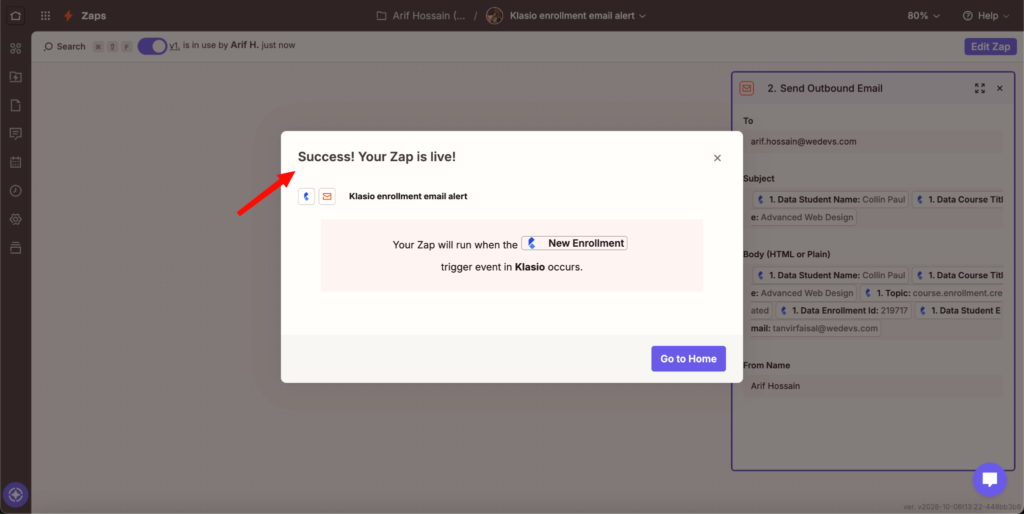
The Zap is live
Step 07: Test It with a Real Enrollment
- Go back to your Klasio admin. Open Sales in the left menu and click on Enrollments. Click on Add Enrollment to enroll a student by hand.
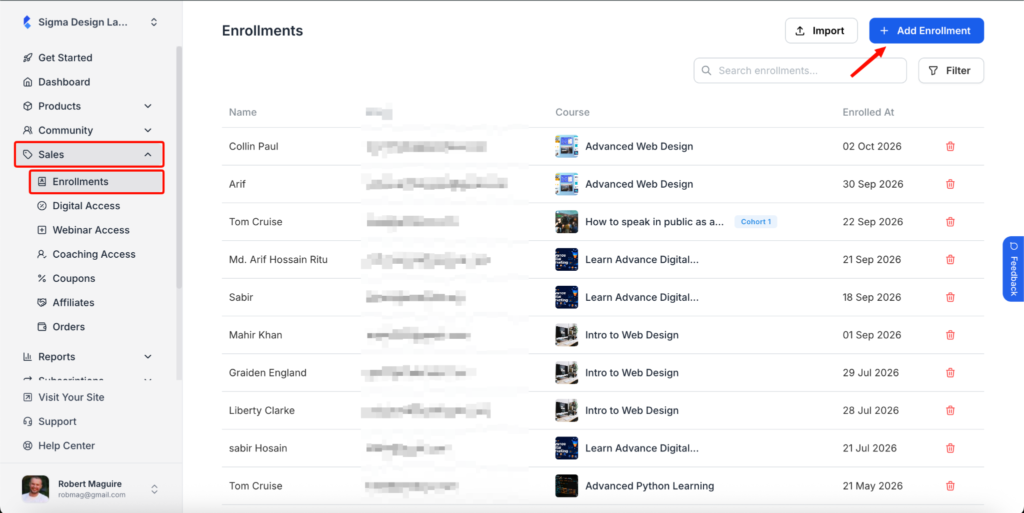
- In the Create Enrollment window, click on Select Student and search for the student. Then pick the course under Select Course and click on Create Enrollment. The enrollment appears at the top of the list, and Klasio sends the event to Zapier at that moment.
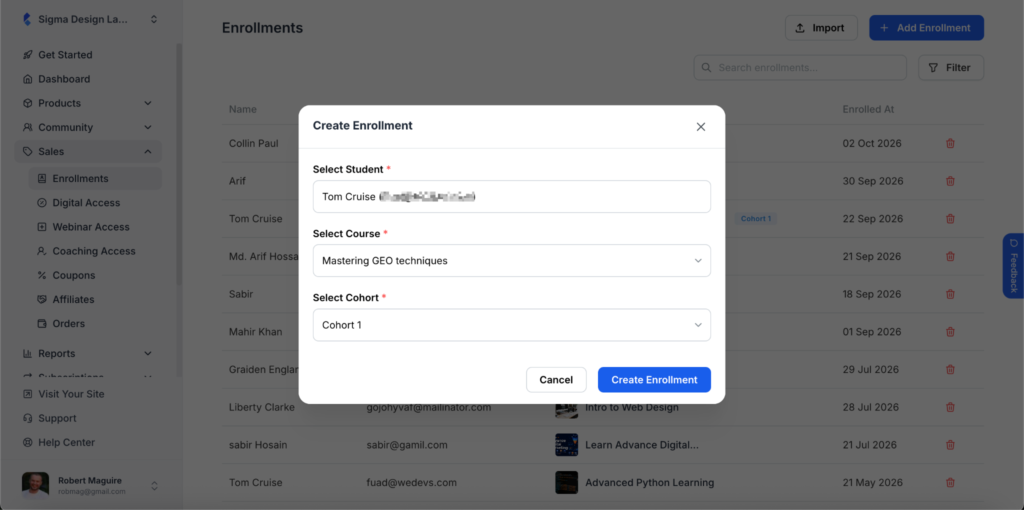
Creating a test enrollment
- In Zapier, open Zap history from the left menu. The new run shows as Successful. Click on the arrow on the right to open it.
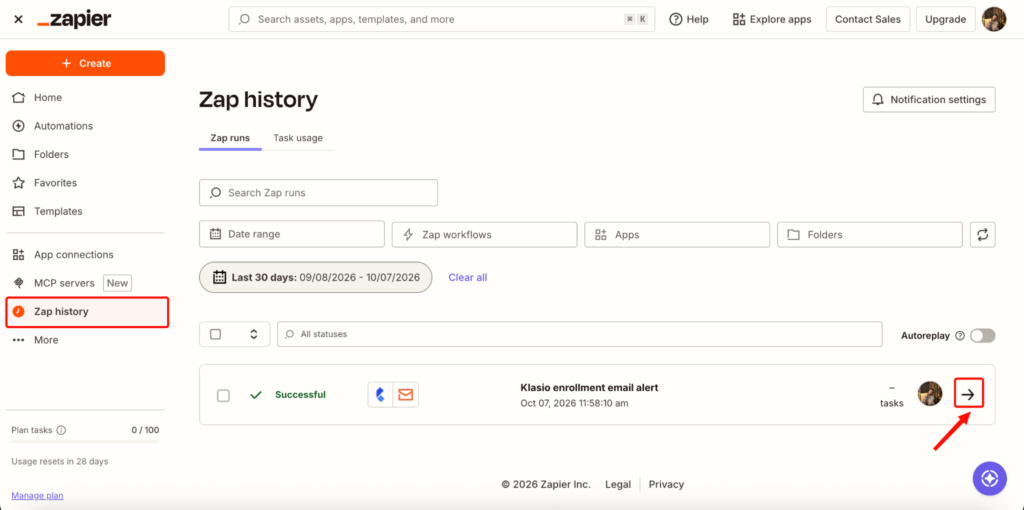
The successful run in Zap history
- Step 1 found the new enrollment in Klasio, and step 2 sent the email. Click on step 2 to see the email that was sent.
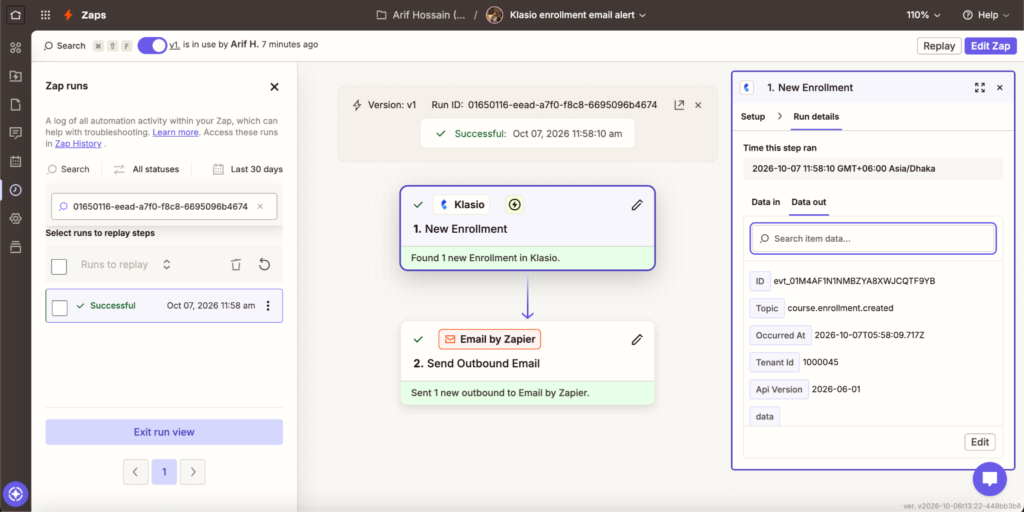
The email sent for the real enrollment
With this, Klasio now triggers Zapier, and Zapier takes the action.
Part 3: Use Klasio as an Action
In this part, something happens outside Klasio, and Zapier uses the Klasio API to create a student. This is useful when you collect sign-ups or sell outside Klasio. As an example, we will use a simple Zapier form as the trigger. The Klasio steps are the same for any other trigger app.
Step 08: Build a Sign-up Form
- On the Zapier home page, click on Form.
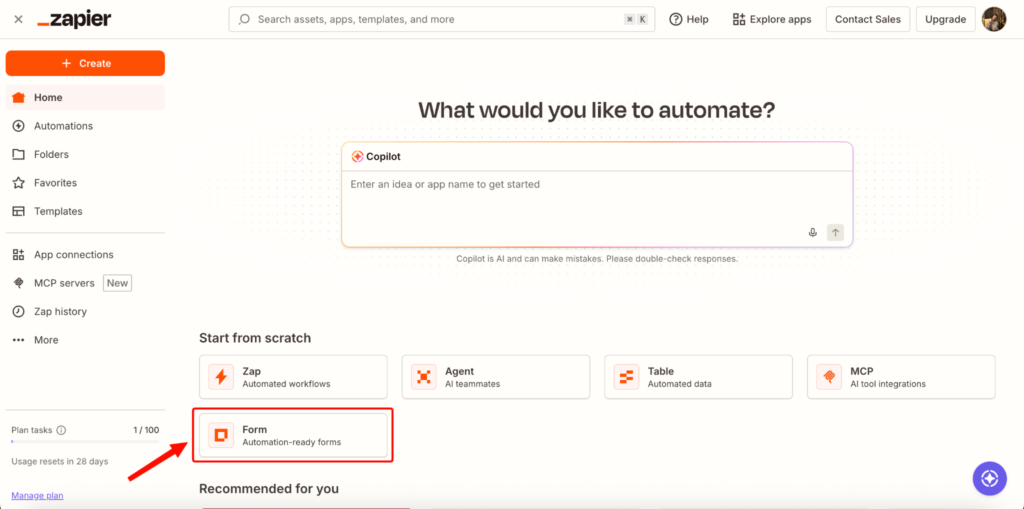
Form on the Zapier home page
- Zapier opens the form builder. Choose Blank form.
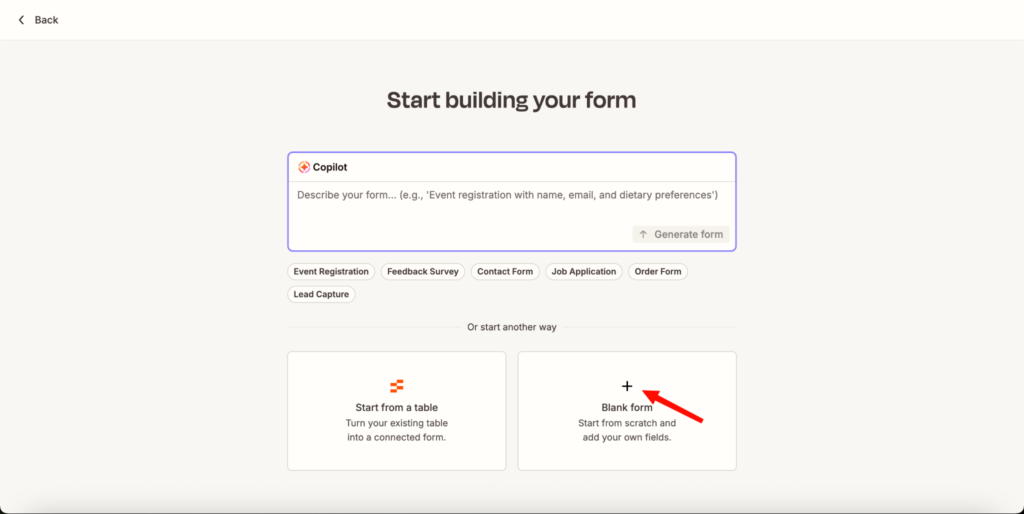
Starting from a blank form
- Click on the form to edit its fields. In Field Settings on the right, change the Label to “First name”.
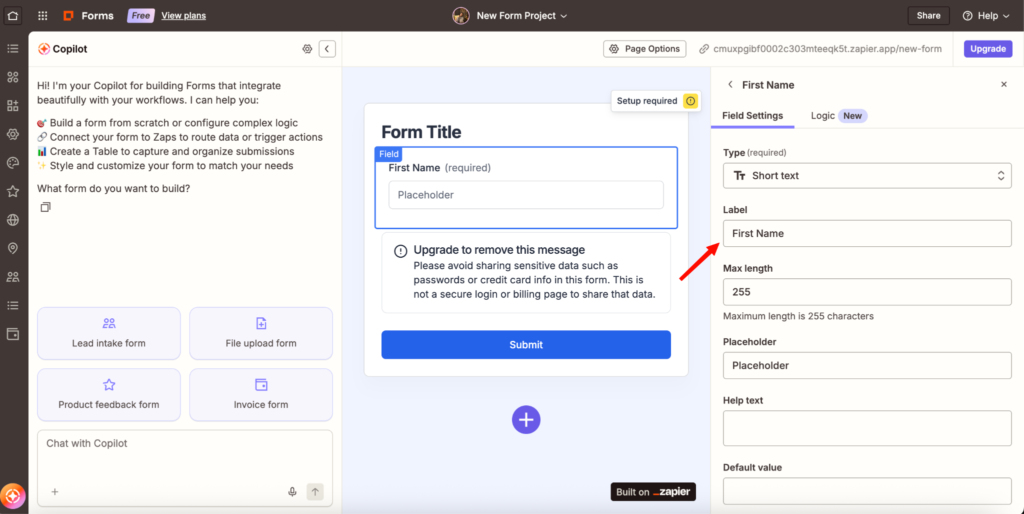
Renaming the first field to First name
- Click on Add field. Type “Last name” as the label, add a placeholder if you like, and click on Insert field.
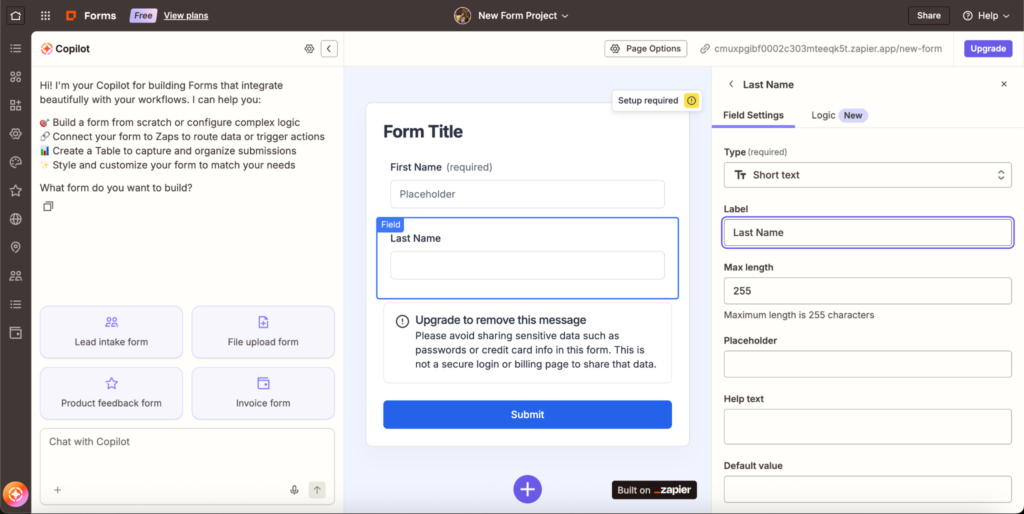
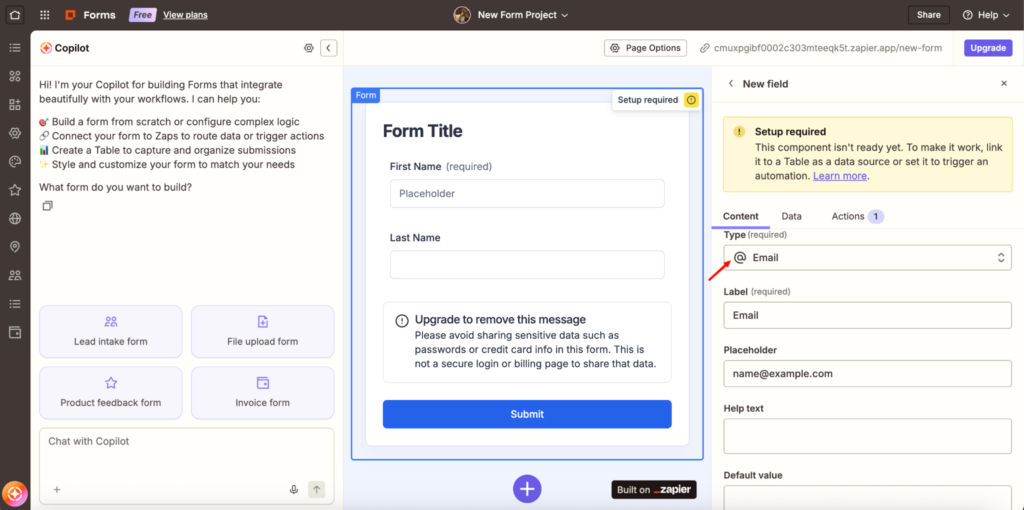
- Click on Add field once more. Open Type and choose Email, so the form checks that a real email address is entered. Type “Email” as the label and tick Required, because Klasio needs an email address to create a student. Then click on Insert field.
- Click on the form title and give your form a name in the Title box, for example “Join Klasio Academy”.
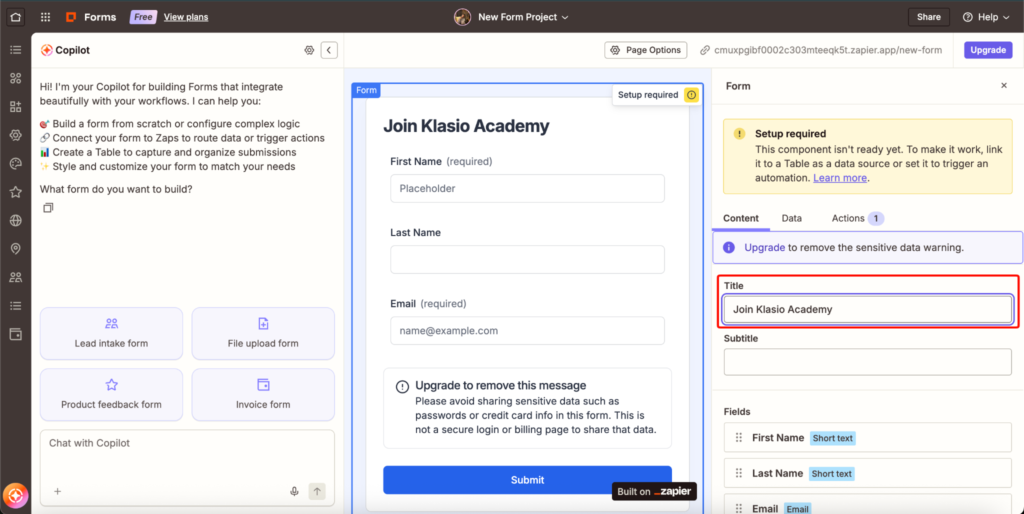
Naming the form
- The form shows Setup required because it isn’t connected to anything yet. Click on Automate form. Klasio isn’t in the suggested list, so click on Build your own automation.
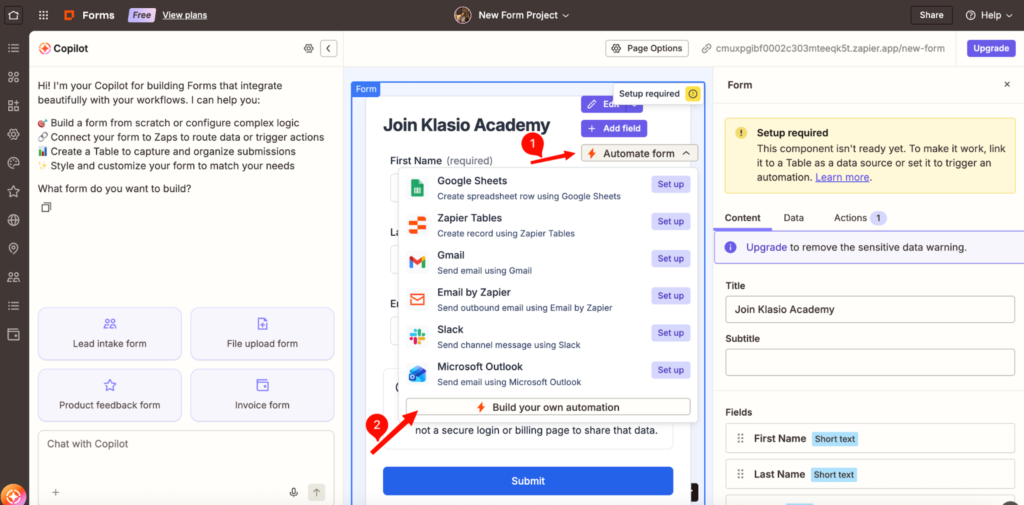
Automate form > Build your own automation
- A new Zap opens in a new tab with Form Submission Created already set as the trigger. Click on the trigger to check it.
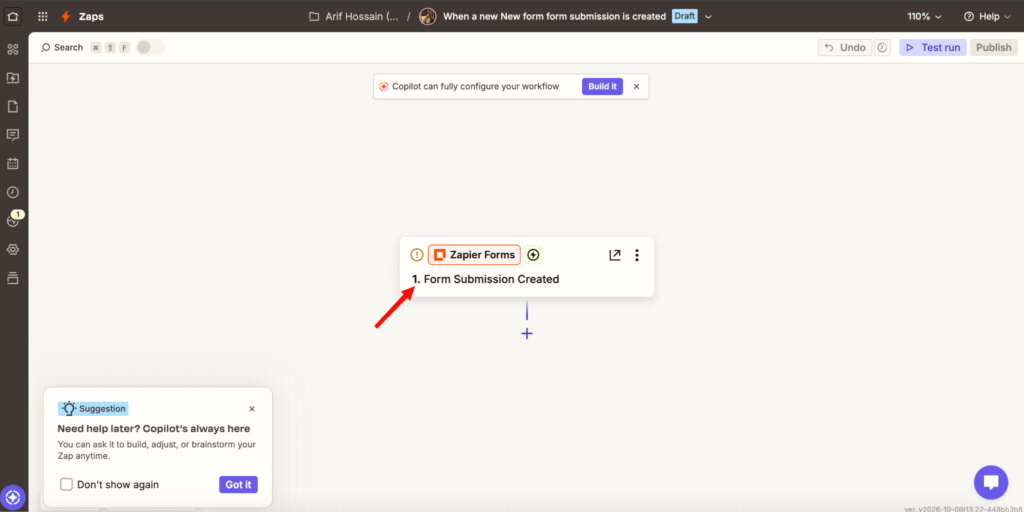
The new Zap with the form as its trigger
Step 09: Send a Test Submission
- To test, Zapier needs one real form submission. Open the form’s public link, fill in a test person, and click on Submit. The form will show “Form submitted”.
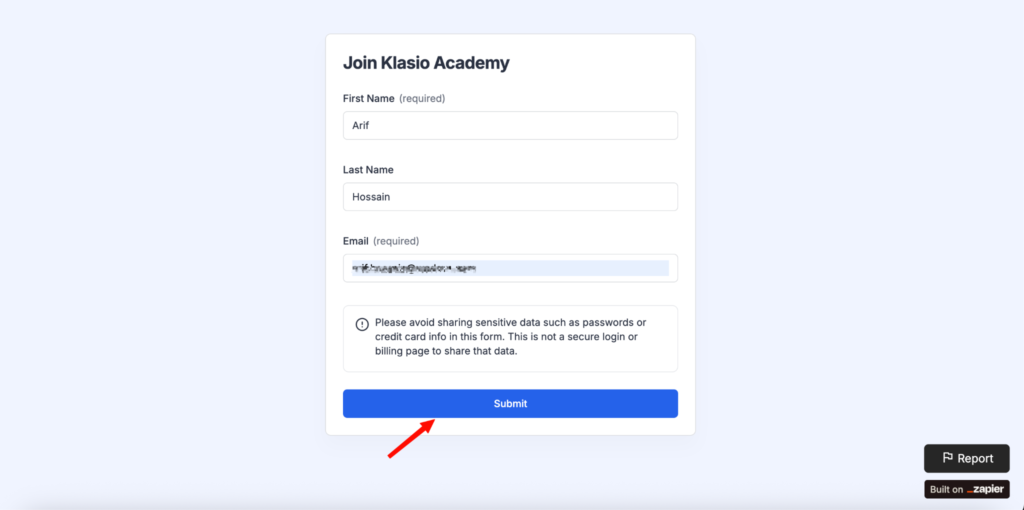
Submitting a test sign-up through the form
- Go back to the Zap editor tab and click on Test trigger. Zapier may first show only a sample record called Form Submission A. Click on Find new records to pull in your real submission.
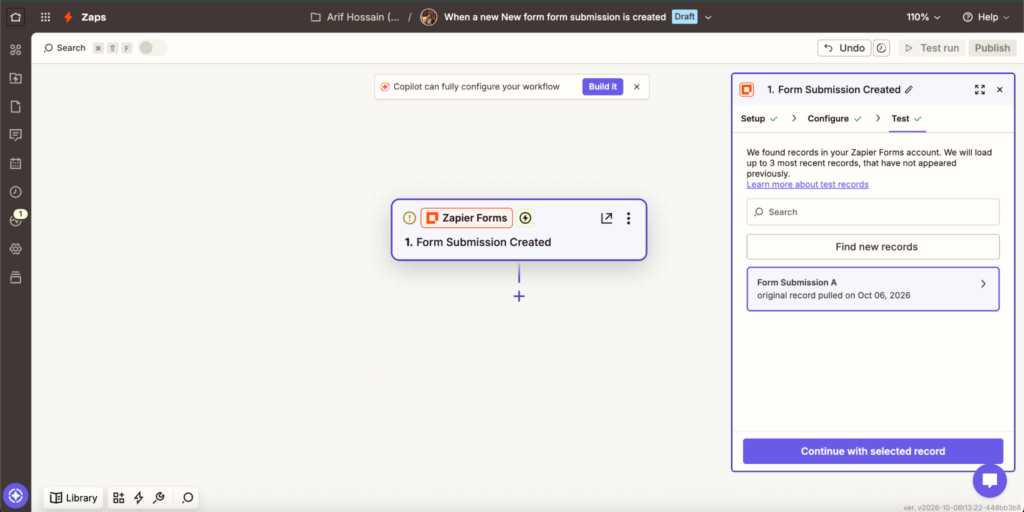
Find new records
- A new record, Form Submission B, appears. Click on it to check its data. It shows the answers from the form. If they look right, click on Continue with selected record.
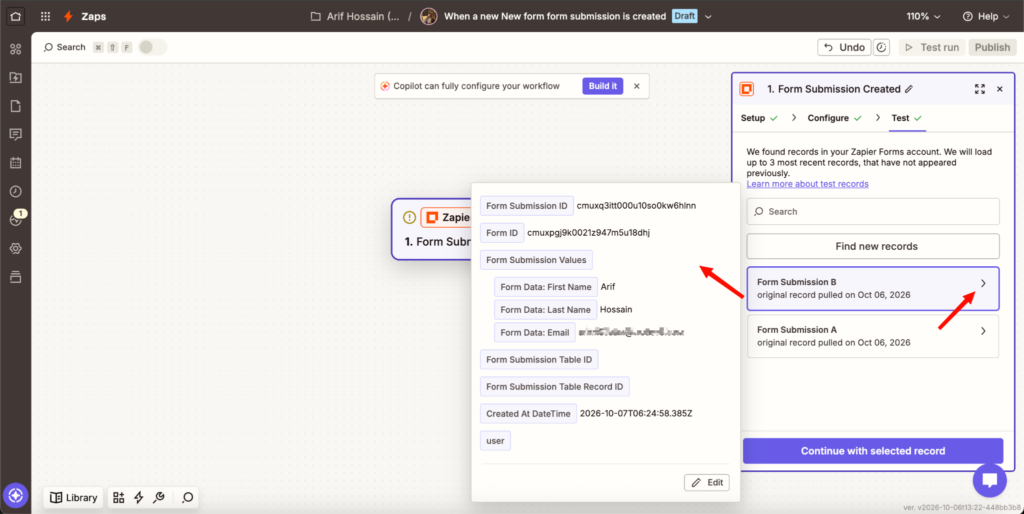
The form answers Zapier received
Step 10: Add the Klasio Create Student Action
- Zapier asks which app to use for step 2. Click on Klasio.
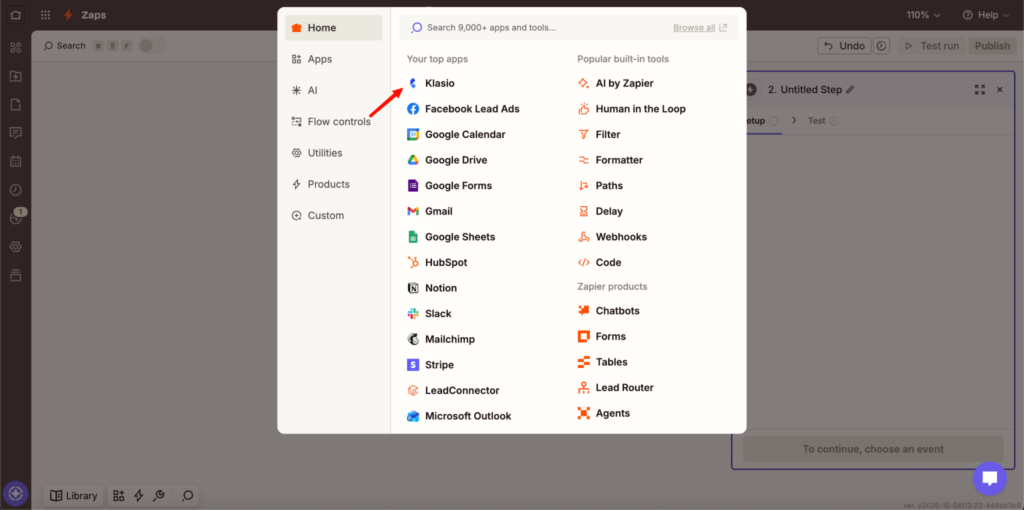
Choosing Klasio as the action app
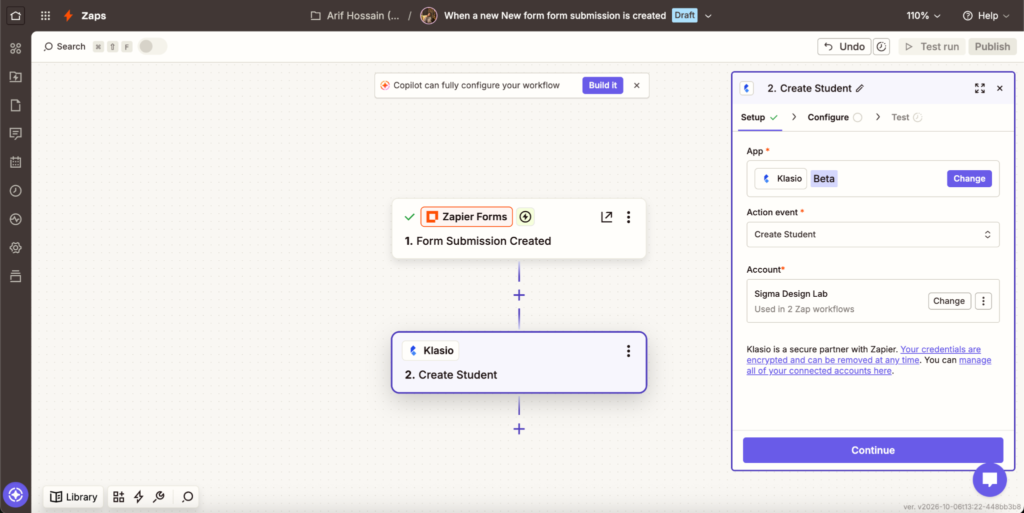
- Open the Action event dropdown and choose Create Student. It creates a new student, or returns the existing one if the email already exists. Under Account, click on Select and pick the Klasio account you connected in Part 1. Then click on Continue.
- The Configure tab shows the student fields. Email is required. First Name, Last Name and Phone are optional. Click on the + button at the end of the Email field, then expand step 1, Form Submission Created, to see the answers from the form.
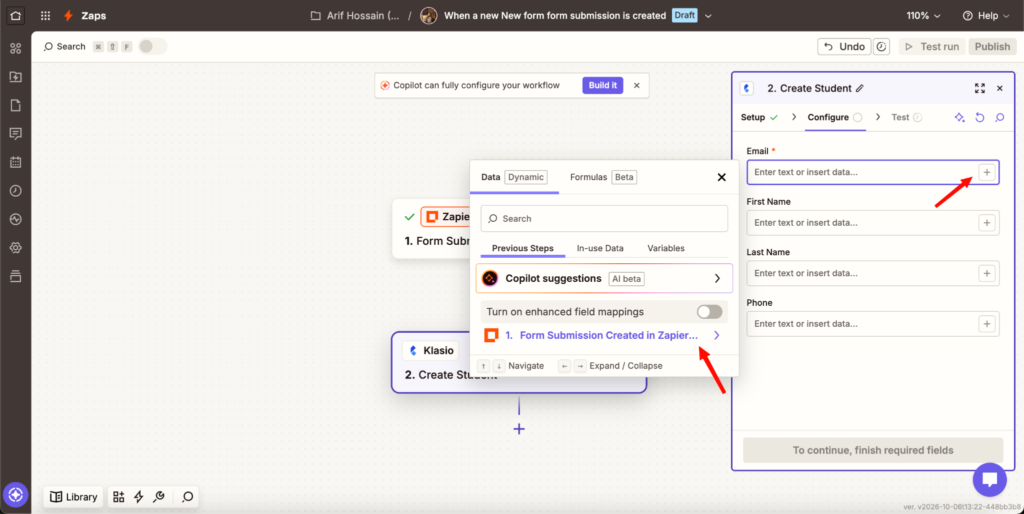
Inserting form data into the Email field
- Type “email” in the search box and pick Form Data: Email. That is the address the visitor typed.
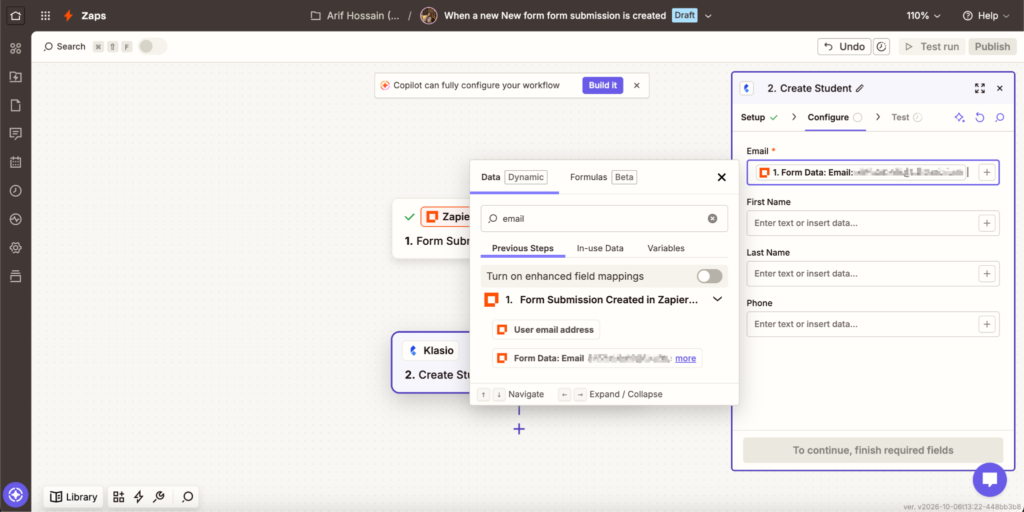
Email mapped to Form Data: Email
Important: Don’t pick User email address. That is your own Zapier login, not the visitor’s email.
- Click on the + button next to First Name and pick Form Data: First name. Do the same for Last Name with Form Data: Last name. Phone is optional, so you can leave it empty. Then click on Continue.
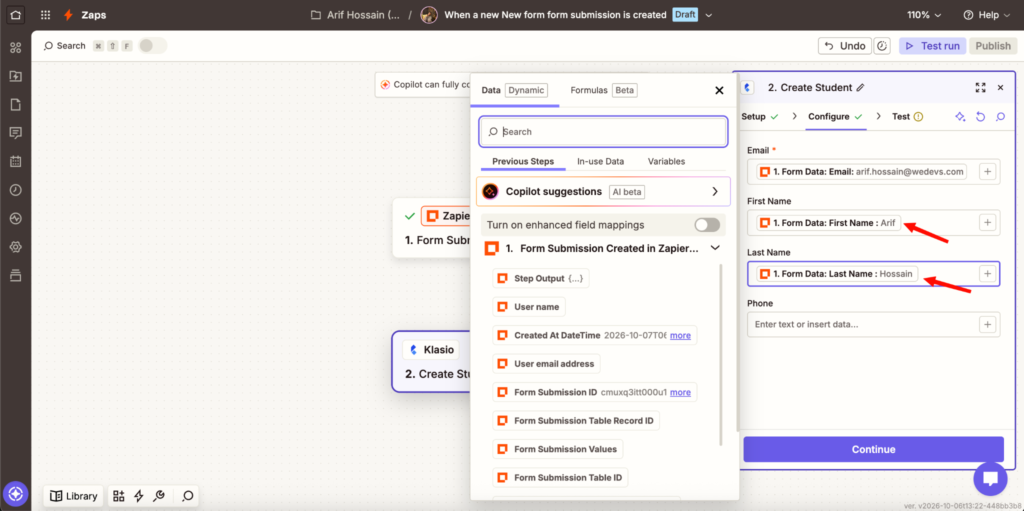
Email, First Name and Last Name mapped
- The Test tab shows exactly what will be sent to Klasio. Click on Test step.
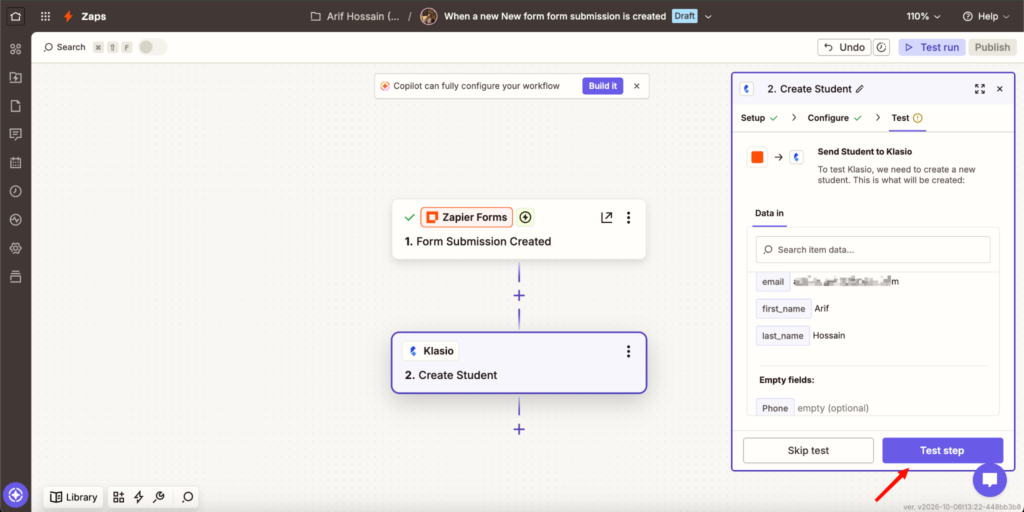
Testing the Create Student step
Important: This test creates a real student in your academy.
- Zapier confirms “A Student was sent to Klasio”. Data out shows the new student with their email and a new student ID, returned by the Klasio API.
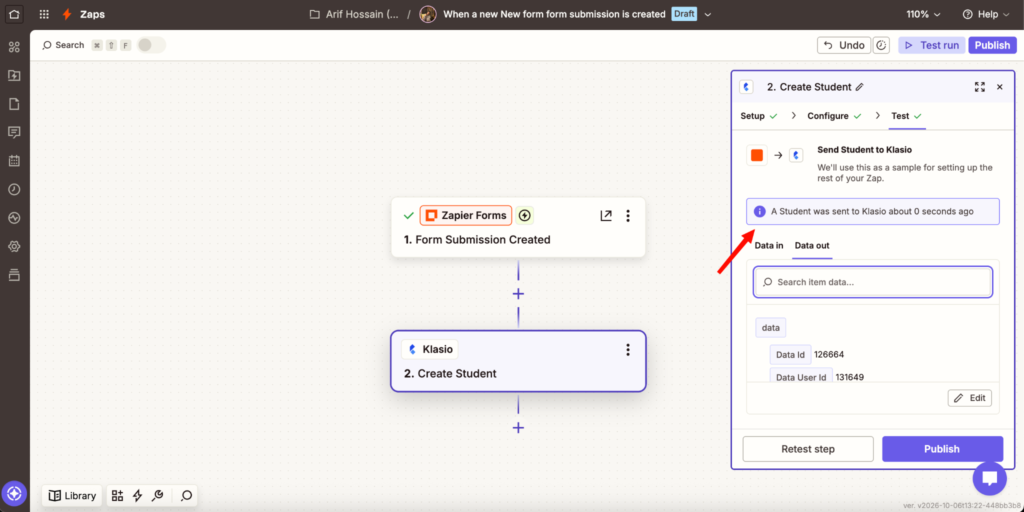
The student was created in Klasio
Step 11: Name and Publish the Zap
- Click on the Zap name at the top, then click on Rename. Type a name, for example “Form sign-up creates Klasio student”, and press Enter. Then click on Publish. The switch at the top shows that the Zap is on.
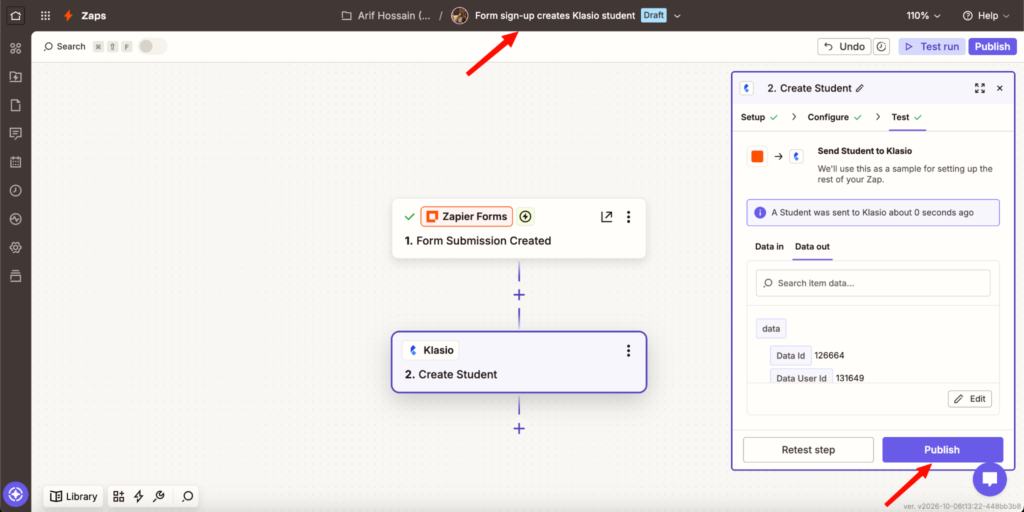
Renaming the Zap before publishing
- Finally, check Klasio. Go to People > Students. The new student appears at the top of the list.
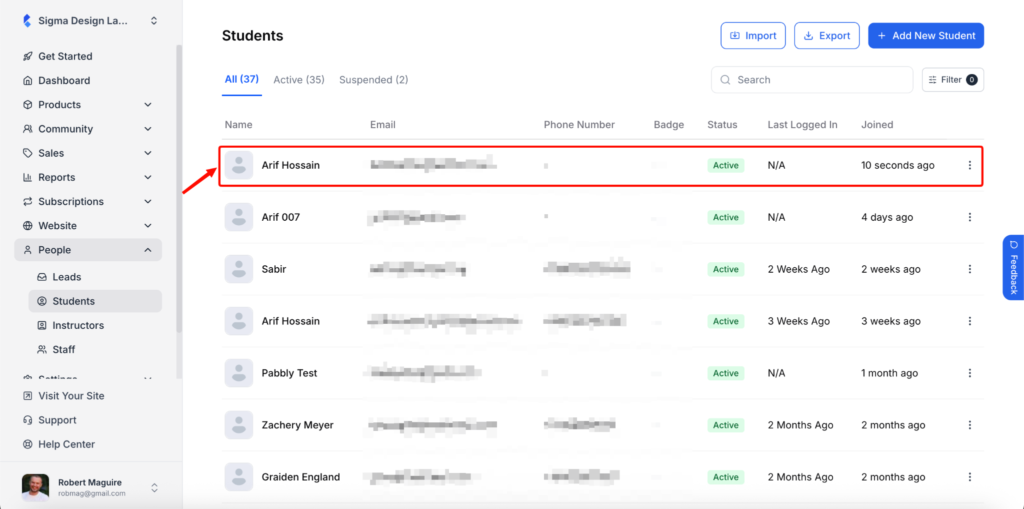
The new student in People > Students
With this, every form sign-up now becomes a Klasio student automatically.
Monitor and Manage Your Zaps
Open Zap history in Zapier any time to see every run and the data that was sent. If you want to pause an automation, turn off the Zap in Zapier. Your other Zaps will keep running.
Once your enrollments flow into Zapier, you can add students to your email tool, post a message in Slack, or update your CRM. If you are still picking an email tool, check our list of email marketing tools for course creators. Many of them connect with Zapier.
Small automations like these add up as your academy grows. We cover more ways to cut repeat work in our guide on how to become a course creator.
Available Triggers and Actions
Here is a quick reference of the Klasio events and actions available in Zapier.
Triggers
These are the events Klasio can use to start your Zaps. All of them are instant.
| Trigger | Description |
|---|---|
| New Enrollment | Triggers when a student is enrolled in a course. |
| New Unenrollment | Triggers when a student is unenrolled from a course. |
| New Completed Course | Triggers when a student completes a course. |
| New Completed Lesson | Triggers when a student completes a lesson. |
| New Assignment Submission | Triggers when a student submits an assignment. |
| New Assignment Evaluation | Triggers when an assignment is graded. |
| New Certificate | Triggers when a certificate is issued to a student. |
Actions
These are the actions your Zaps can perform in Klasio.
| Action | Description |
|---|---|
| Create Student | Creates a new student, or returns the existing one if the email already exists. Needs an email. First name, last name and phone are optional. |
| Enroll Student | Enrolls a student in a course. Returns the existing enrollment if the student is already enrolled. |
| Unenroll Student | Removes a student’s enrollment, along with their progress for that course. |
| Update Student | Changes the details of an existing student. |
If you use Pabbly Connect instead of Zapier, follow our guide on how to integrate Pabbly Connect with Klasio.
If you encounter any issues or are unable to complete the integration, please contact [email protected].