
Paystack lets your students in Nigeria, Ghana, Kenya, South Africa, and Côte d’Ivoire pay for your courses with cards, bank transfer, USSD, and mobile money. Many students in these markets don’t hold an international card. With Paystack, your checkout offers the payment methods they already use every day.
To connect Paystack with Klasio, you need two things from your Paystack dashboard: your Secret Key and a place to paste Klasio’s Webhook URL. We’ll go through the whole process step by step.
Before you get started, make sure you have a Paystack account.
You can collect test payments right away. To receive real money, your Paystack business must be activated first. Paystack’s transaction fees differ by country, so check the Paystack pricing page for the rates in your market.
Step 01: Open the Paystack Settings in Klasio
1. From the admin dashboard, go to Settings and then click Payments.
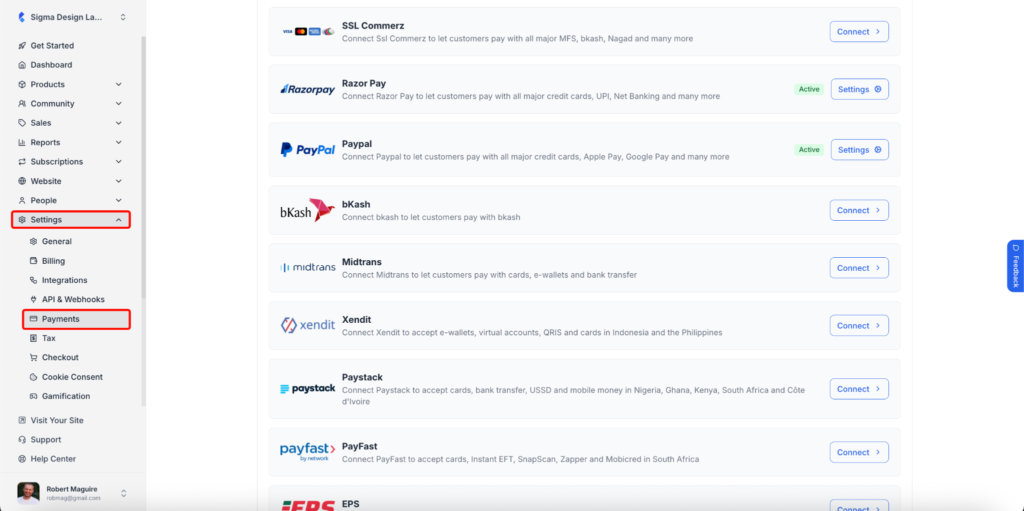
2. Find Paystack in the list of payment gateways and click on its Connect button.
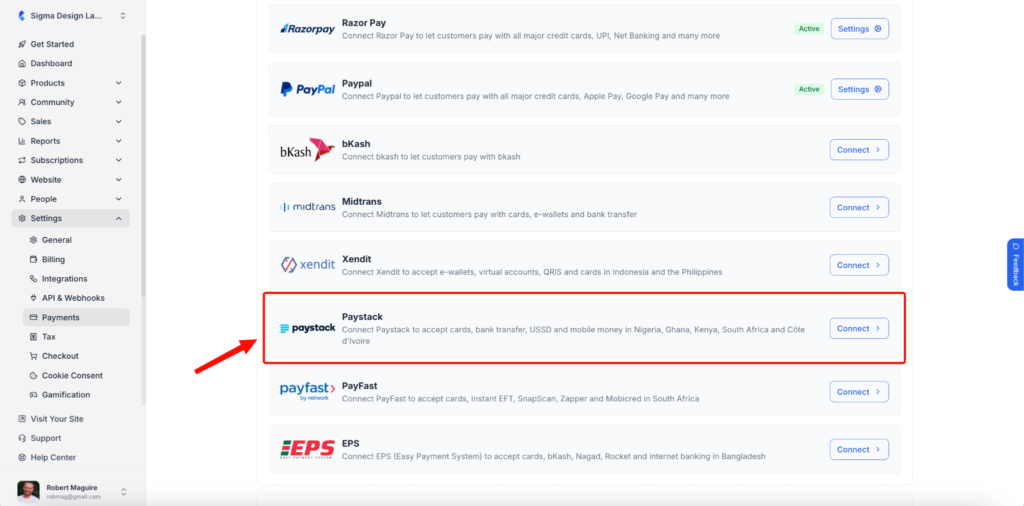
A popup titled Paystack Settings will appear. This is where you’ll add all the details for your Paystack connection.
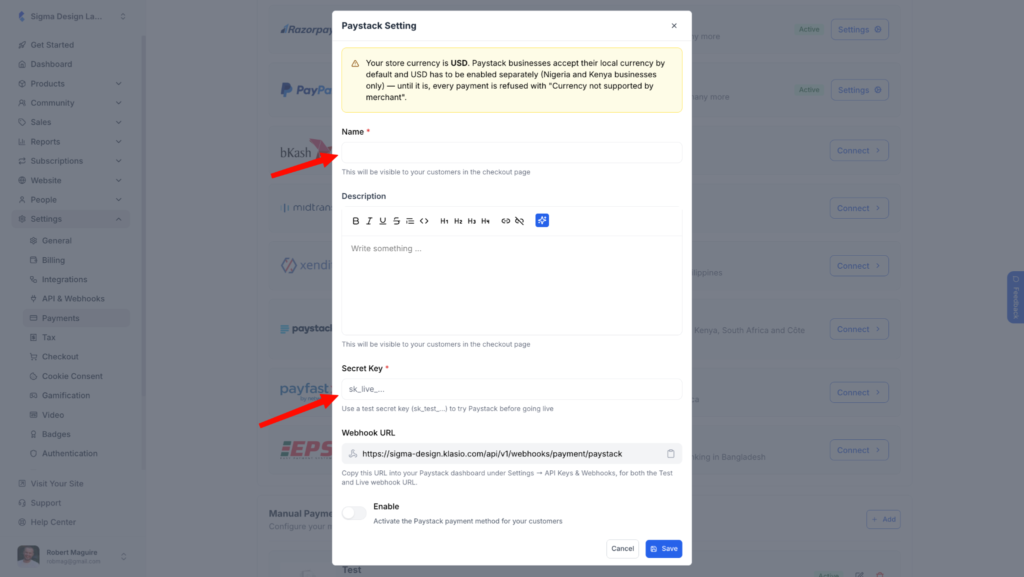
If your store currency is one that Paystack doesn’t accept by default, you’ll see a yellow notice at the top of the popup. Read it before you continue. We explain what it means in the currency section below.
Step 02: Add a Name and Description
4. In the Name field, type the name your students will see at checkout, for example “Paystack” or “Pay with Card, Bank or Mobile Money.” This field is required.
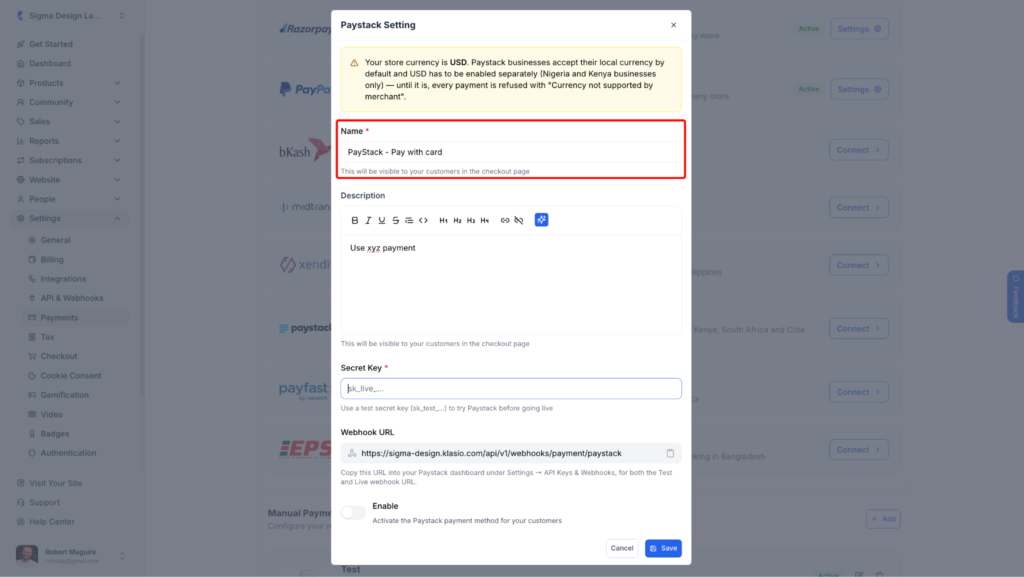
In the Description box, you can add a short note for your students. For example, you can tell them which payment methods they can use. This text also shows up on the checkout page. The editor lets you format the text with bold, italics, lists, headings, and links. The Description is optional.
Step 03: Get Your Secret Key from Paystack
Klasio only needs your Paystack Secret Key. You don’t need the Public Key.
6. Log in to your Paystack dashboard. Click on Settings at the bottom of the left menu and open the API Keys & Webhooks tab. You can also go there directly from this link once you’re logged in.
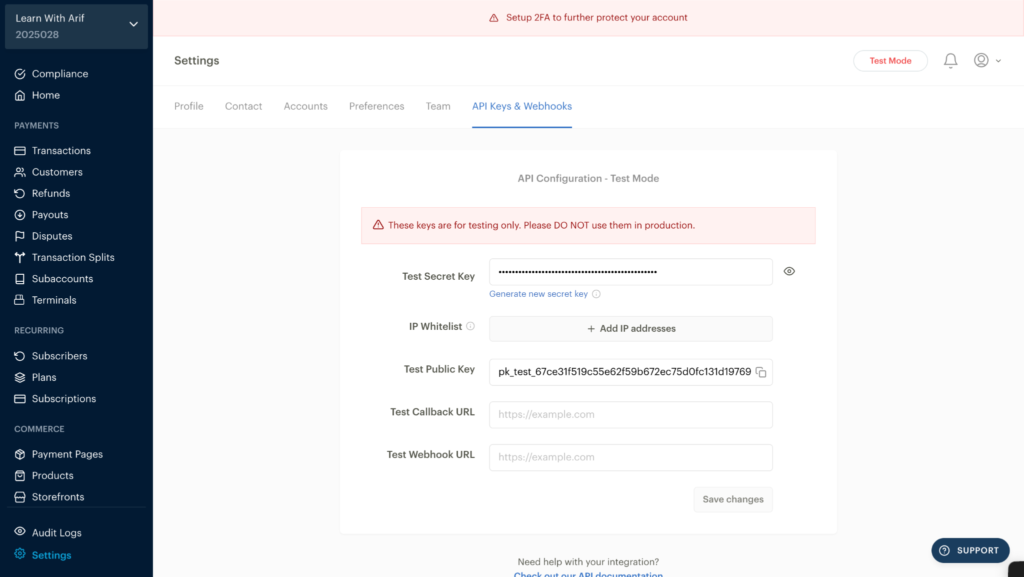
7. Under API Configuration – Live Mode, click on the eye icon beside Secret Key. Paystack will ask for your account password. Once you enter it, you’ll see the key. Click on the copy icon inside the field to copy it.
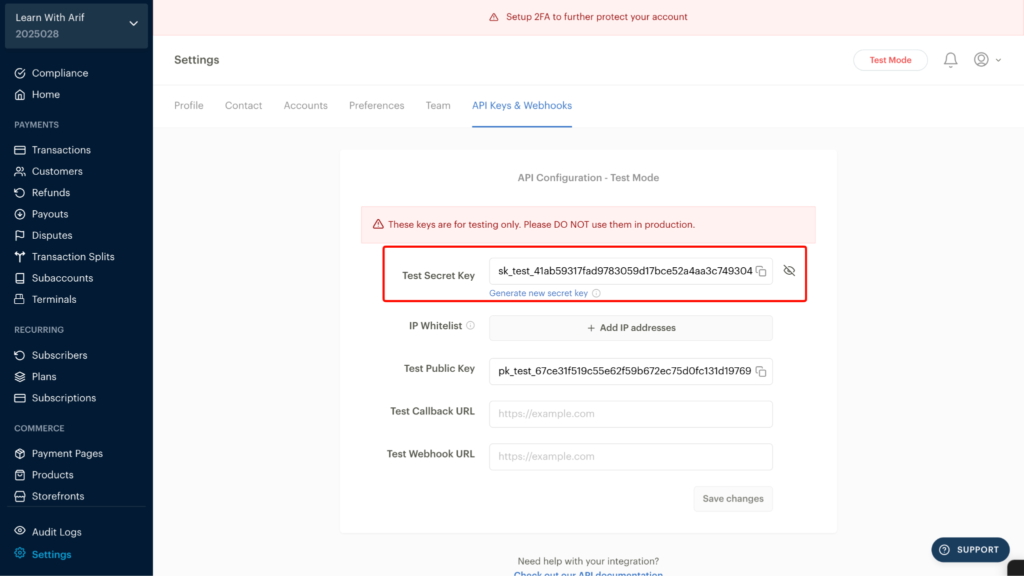
Paystack gives you two sets of keys. Live secret keys start with sk_live_ and test secret keys start with sk_test_. To see your test key, switch your dashboard to Test Mode from the top right corner. The page will then show API Configuration – Test Mode with your Test Secret Key. You can only switch to Live Mode after your Paystack account is activated.
Keep your secret key private. Anyone with this key can act on your Paystack account.
8. Go back to the Klasio popup and paste the key into the Secret Key field.
If you want to try Paystack before going live, paste your sk_test_ key here instead. We cover testing later in this guide.
Step 04: Add the Webhook URL to Paystack
A webhook is how Paystack tells Klasio that a payment went through. Without it, Klasio may not know when a student has paid. So, don’t skip this step.
9. In the Klasio popup, find the Webhook URL field. Klasio creates this URL for your academy. It looks like this:
https://your-academy.klasio.com/api/v1/webhooks/payment/paystack
Click on the copy icon at the right end of the field to copy it.
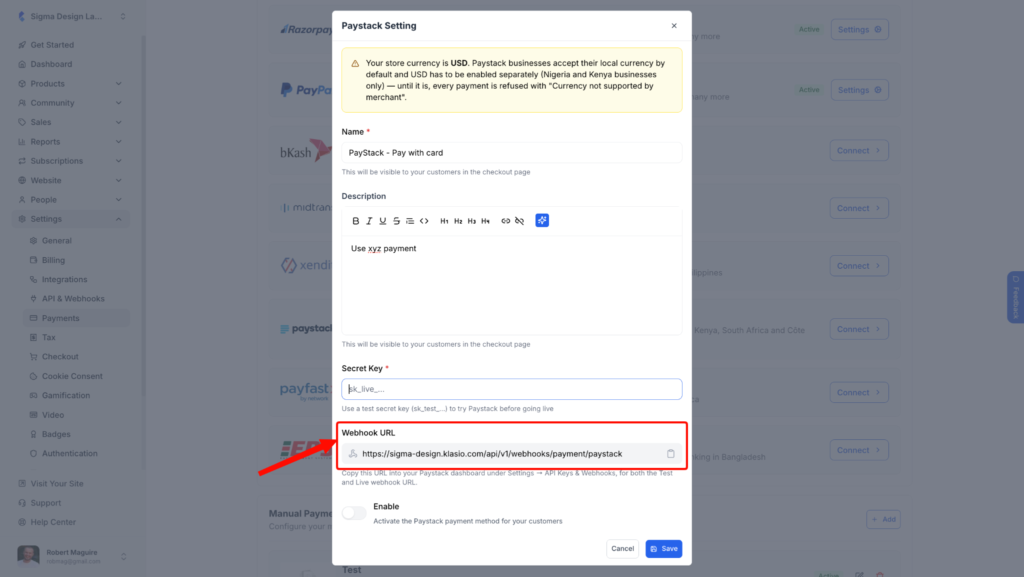
10. Go back to Settings > API Keys & Webhooks in your Paystack dashboard. Paste the URL into the Live Webhook URL field and click Save changes.
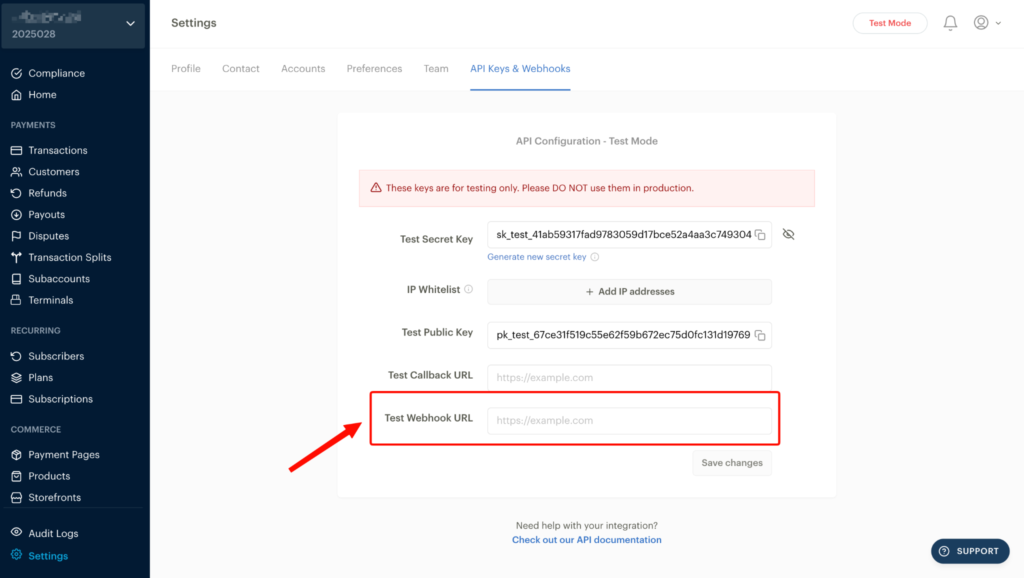
11. Now, switch your dashboard to Test Mode from the top right corner. The page will change to API Configuration – Test Mode. Paste the same URL into the Test Webhook URL field and click Save changes again.
Paystack keeps separate settings for live and test mode. That’s why you need to save the URL in both places. Klasio uses the same Webhook URL for both.
Step 05: Enable Paystack and Save
12. Back in the Klasio popup, turn on the Enable toggle. This activates Paystack as a payment method for your students.
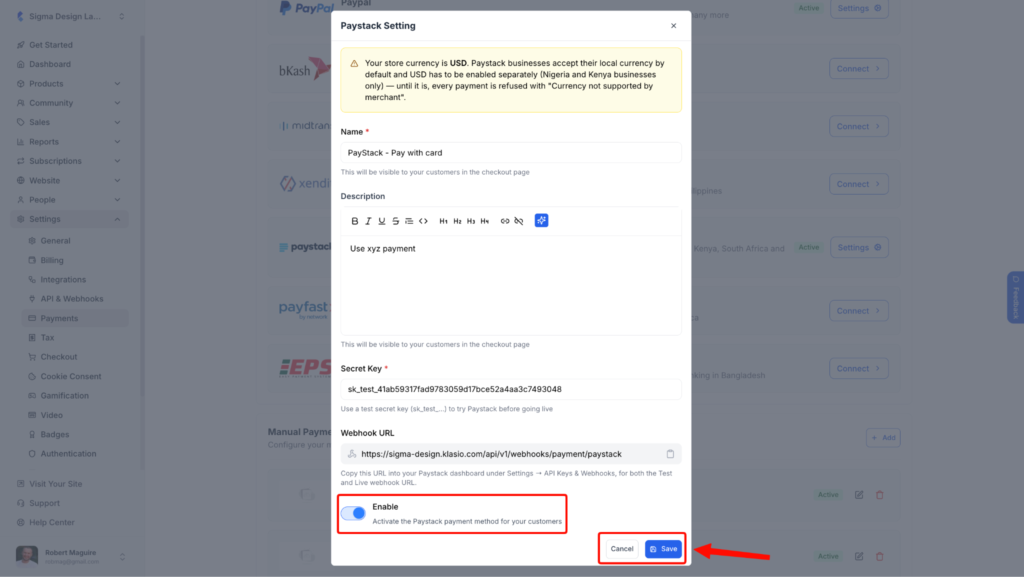
13.Click on Save to finish the setup.
With this, Paystack is connected to your academy. Your students can now choose Paystack at checkout.
Choose Which Payment Methods Students See
When a student picks Paystack at checkout, the payment methods they see come from your Paystack account settings, not from Klasio.
Cards work on every Paystack account. Other methods like bank transfer, USSD, and mobile money depend on the country your Paystack business is in. To turn methods on or off, go to Settings > Preferences in your Paystack dashboard.
Check Your Store Currency
Paystack businesses accept payments in their local currency by default. That means NGN for Nigeria, GHS for Ghana, KES for Kenya, and ZAR for South Africa.
If your Klasio store currency is USD, you’ll see a notice at the top of the Paystack Setting popup. Paystack only lets Nigeria and Kenya-based businesses accept USD, and you have to enable it separately with Paystack. Until USD is enabled on your Paystack account, every payment will fail with the error “Currency not supported by merchant.”
So, before you go live, do one of these:
- Set your Klasio store currency to the local currency of your Paystack business.
- If your Paystack business is in Nigeria or Kenya, enable USD payments on your Paystack account first. Paystack explains the requirements in its guide on enabling international payments.
Things to Know
Klasio supports Paystack for regular course sales. Automatic recurring billing for subscriptions currently runs through Stripe. If you plan to sell subscriptions to students in Paystack markets, read our guide on the course subscription business model first. It covers your options when a local gateway doesn’t support automatic renewal.
Paystack is one of several regional gateways we’ve added to Klasio over the past year. You can read about the others in A Year and Beyond of Building Klasio.
Turn Off Paystack Anytime
If you want to stop accepting payments through Paystack, go to Settings > Payments and open the Paystack settings. Turn off the Enable toggle and click Save. Your details stay saved, so you can turn it back on later.
If you face any issues or can’t complete the integration, please contact us at [email protected].